MS Word
How to Create an AutoMark Index in Microsoft Word
How to create an index in Microsoft Word can be done in two ways, namely using the Mark-up Index (Manual) and Concordance Index (AutoMark).
What is the difference between the two indexes? The difference is, Mark-up Index is an index on documents with a small number of pages. Meanwhile, the Concordance Index is used to index documents with a large number of pages.
This time, we will explain a tutorial on how to create an AutoMark index (Concordance Index), which is to create a list of entries (text or phrases) for the index on a separate document.
HOW TO CREATE AN AUTOMARK INDEX IN WORD 2007 AND 2010
The tutorial on how to create an auto mark index which will be explained below can be applied to Microsoft Word 2007 and 2010, which is divided into three stages.
Step 1: Create a Concordance (AutoMark) document to list entries (text or phrases) for the index.
The steps:
- Open a new document in Microsoft Word 2007 or 2010.
- Then, insert a 2-column table. How: on the Insert tab, select the Tables group, click Table and select two columns (2×1 Table).
- In the first column, type the text or phrase in the document that you want to mark for index. Example: Pie Chart.
- In the second column, type the text to be displayed on the index page. Example: charts, graphs. Tip: to create subcategories, separate them with a colon (:).
- Repeat steps 3 and 4 for the next entry until complete.
- Save the document for which the index page will be created and name it as needed.
Stage 2: Mark entries (text or phrases) for the index with auto mark.
The steps:
- Open the document you want to index. If necessary, first back up this document.
- Place the cursor on the page to index. Usually on the last page.
- Type a page title and press Enter to put a space between the title and the index body.
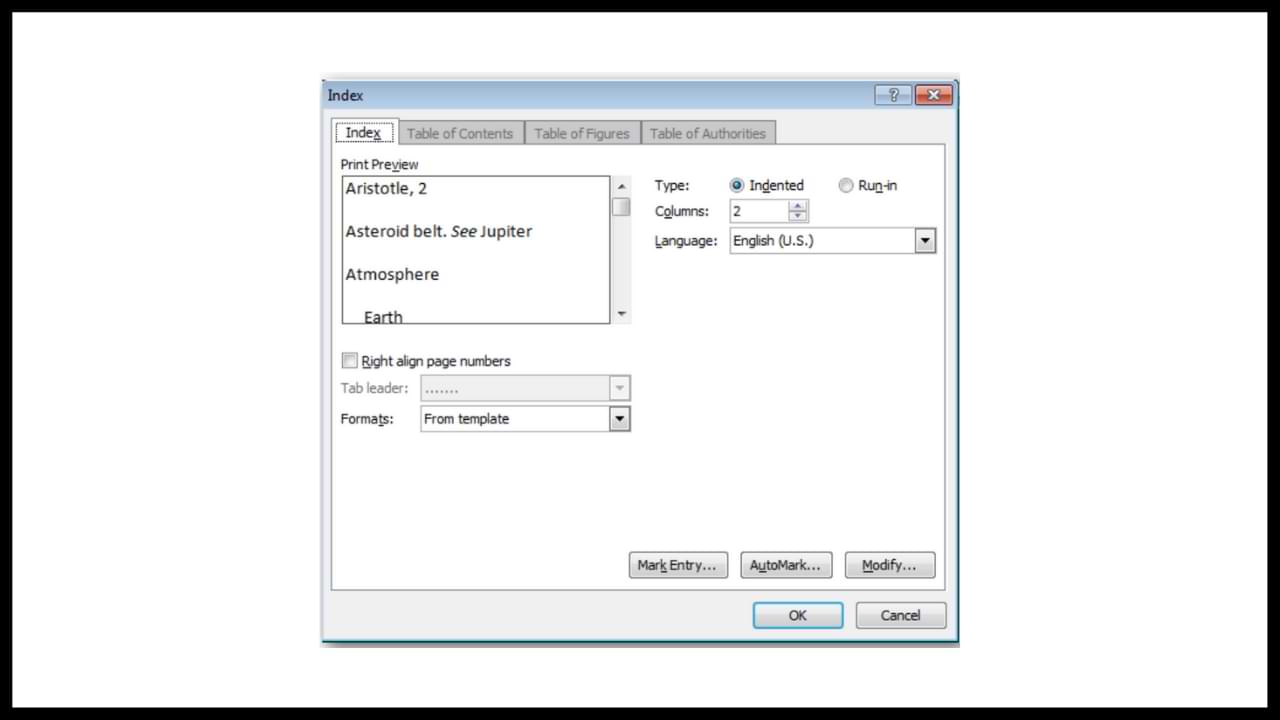
- On the References tab, in the Index group, click Insert Index.
- On the Index tab, click the AutoMark button.
- Find the keyword.docx document. Select All Files (.) or All Word Documents to display all documents.
- Click the document name and click Open. Later, Microsoft Word will mark all text or phrases according to the list in the first column of the concordance document (keyword.docx).
- Microsoft Word will also enable the Show All Formatting Marks feature which will display the XE field. The formula text in the figure is an example of the text marked as an entry for the index.
- To remove this display, on the Home tab, in the Paragraph group, click Show/Hide Show/Hide Microsoft Word or press CTRL + SHIFT + *.
Step 3: Display the index in alphabetical order with page numbers.
The steps:
- Make sure the cursor position is active on the index page. Then on the References tab, in the Index group, click Insert Index.
- On the Index tab, do the following:
– Check the Right align page numbers box, to right-align the page numbers.
– Select the Tab leader that you want to use (connecting text and page numbers in the form of dotted lines, dots, and others).
– Columns, generally the index consists of 2 columns. If you want to increase or decrease the number of columns, change the number in the box next to it. - Click OK.
Later, Microsoft Word will display a list of indexes according to the text in the second column of the concordance document (keyword.docx).
How to update the index in Microsoft Word:
– If there is a change in the second column of the concordance document (keyword.docx), click on the index and press the F9 key to update.
– If there is a change in the first column of the concordance document (keyword.docx), first delete all entries for the index in the document, then repeat steps one to three as above.
For how to delete entries, you can use the Find and Replace feature:
a. Press CTRL + H to open the Replace tab in the Find and Replace dialog box.
b. In the Find what box, type ^d to search for the field for the index (XE field).
c. Leave the Replace with box empty.
d. Click the Replace All button, to delete all index fields in the document.
Notes:
Use of the AutoMark (Concordance) index in Microsoft Word which contains a list of entries (text or phrases) for the index, useful for large, long-page documents.
Knowing how to create an AutoMark index in Word as described above will make it easier for you to see the text or phrases used. You can also edit the index on the fly.
MS Word
How to Make Letterhead in Microsoft Word

How to make a letterhead in Word correctly and neatly is actually easy, but surely there are still many of you who don’t know how to make it.
In an official letter, of course, there is a letterhead and there is always a line at the bottom right. Well, it turned out to be quite easy to make you know.
Apart from being the introduction to a letter, letterhead is also commonly used as a place to write the identity of the letter, such as the identity of the sender and recipient.
For those of you who want to know how to make it, here we explain in full the steps to make a letterhead in Word for you.
HOW TO MAKE LETTERHEAD IN WORD
You should know how to make a letterhead in Word this time, guys, especially when you want to send letters between agencies.
Although not all agencies use it, it doesn’t hurt you to try and find out how to make this letterhead, here are the steps!
- First, open your Word.
- Place the cursor at the back of the last word of the letterhead
- Then select the menu Borders – Borders and Shading.
- After the border menu appears, all you have to do is select the line you want on the menu with a sign like this.
Don’t rush to click Ok, because there’s one more thing you have to do to make it, guys. In the section below, remove it or set it like this to make the line only exist at the bottom, and then Ok.
Yeah, you have successfully drawn the line, Guys, it’s easy and fast, right, how to make a letterhead in Word?
You don’t need to be confused anymore about how to make it. For beginners, making letterhead or letterhead does sound quite difficult.
In fact, how to make a letterhead in Word is fairly easy as long as you already know the procedure. After all, the letterhead cannot be made casually because it is an official identity.
The letterhead contains the official identity of an institution, agency, or company. Well, you can create an official identity on the letterhead in Microsoft Word.
MS Word
How to Create a Background in Microsoft Word

This way of making a background in Word aims to beautify the appearance of the document and make it more attractive Guys.
Usually, this is often found in the use of proposals, certificates, covers, and not infrequently in job applications.
With this function, how do you make it? It’s so easy. Yes, although there are several ways you can do this, you can follow this tutorial in full.
HOW TO MAKE A BACKGROUND IN WORD
This background function is very useful if you want to create a document that upholds the originality of Guys, for example, a thesis.
In addition to having to know how to create a table of contents in Microsoft Word, you may also need to know how to create a background in your thesis document, especially in showing the results of the tests you did.
How to make this background is also needed if you want to make an official letter from the agency. Besides needing to know how to make letterhead lines in Word, you also need to know how to add a background to the letter. Here’s how:
- The first thing you can do is change the color.
- Go to Design – Page Color – and immediately choose a color like this.
That is the easiest way and you can change the color according to your needs or tastes, guys. In addition to this method, you can also replace it with an image that you have.
The method is almost the same, guys, pay attention to the following rare:
- Go to the Design menu.
- Click Page Color.
- Select Fill Effects.
- Next, select the tab Picture – Select Picture – From a File.
- Then find the image you have and press Ok
- Finished! The background will change.
But, you also need to remember that both methods will not appear when you print either color or image.
To make it appear when printing, then you need to go to the File menu – Options – Display – and check the Print background colors and Image.
Well, after you go through these few steps, the background will change and also enter when you print, GRATZ!!! It’s easy to make a background in Word.
MS Word
How to Create a Signature in Word

There are several ways to make a signature in Microsoft Word. And the method is really easy, just follow the steps below, guys!
Making a signature is really needed, especially in the digital era like now, right? Of course, you need a signature in your Word file, so from that our Team will provide this tutorial in detail.
Actually, you can also use a third application or additional devices such as pens that support your PC or laptop. But this is the easiest way without using other devices and applications Guys.
HOW TO CREATE A SIGNATURE IN WORD
You need to sign first, Guys on a piece of white paper. Make sure the paper is really white and the pen has colour ink that you can really see clearly.
This function is for later photos or files the resolution will be smaller Guys. Not only that, but the customized color saturation will also reduce the thickness of the pen color, you know.
So make sure you give a signature with a clear enough emphasis. Here’s how to create a signature in Word:
- Prepare a white paper with a signature on it. Photos using a smartphone or you can directly scan the signature through a scanner.

- You can reduce the resolution and crop it so that the photo focuses on the signature. For convenience, click the image file > Edit.
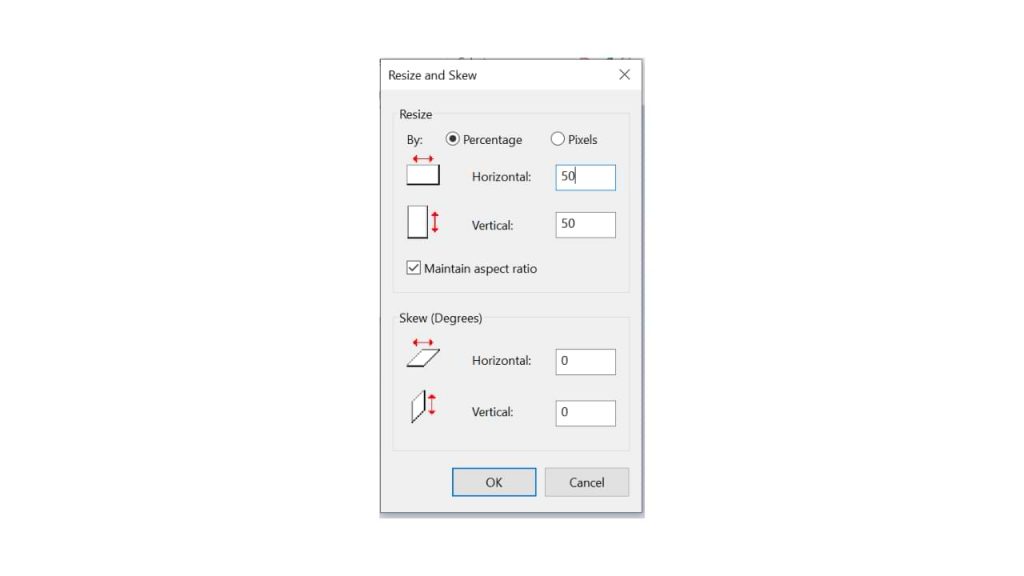
- On the Paint menu, you can resize to reduce the resolution. Choose 50 per cent resolution, fill Horizontal 50 and Vertical 50
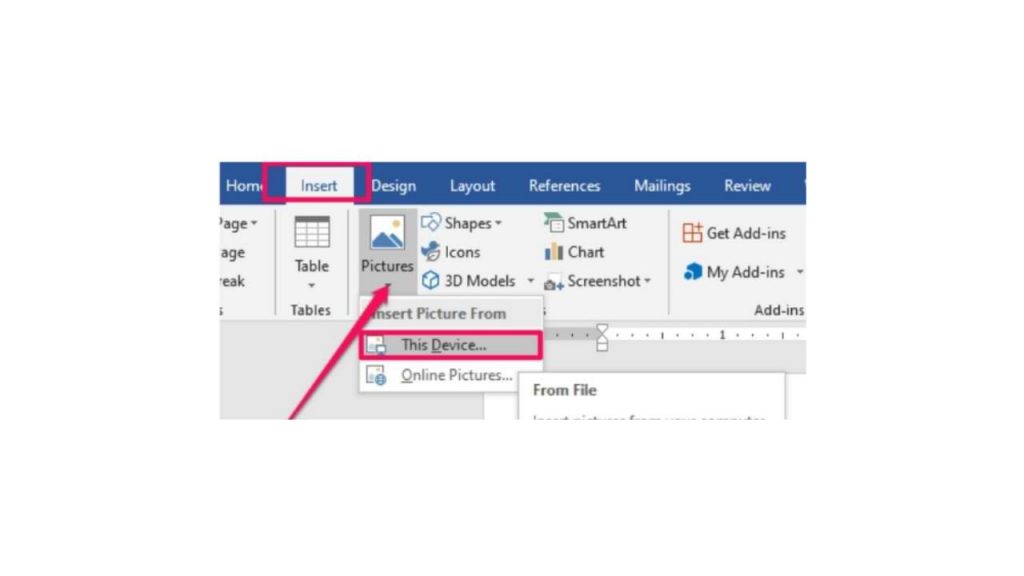
- Hover over the exact position of the word you want to add a signature to. Click Insert > Picture > insert the previous signature image file.
- After you insert the image, reduce the size again using the cursor for more precision.
- Double click on the image.
- On the Format menu, select the Color > Recolor > Black and White 50 per cent submenu.
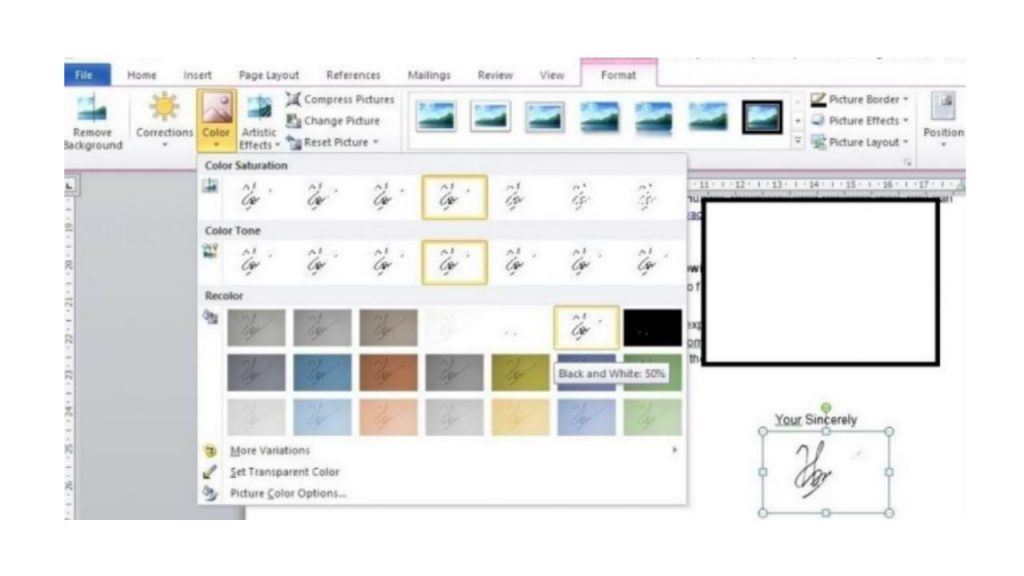
- if your signature is not clear, double click on the image, select menu Correction > Brightness 0 per cent (Normal) Contrast 40 per cent.
You can change the last two steps depending on the contrast and color saturation you want, guys. So you can at the same time adjust the thickness of your signature that has entered the word, so guys.
I also said what Guys, how easy it is to make a signature in Microsoft Word! The most important thing is to make sure your signature is clear enough, and the photos are of high enough quality. Obviously, so that later your signature looks good, it doesn’t break.
-

 Phones5 years ago
Apple iPhone 11 (2019) – Release, Info, Leaks, Rumors
-
![Huawei's New Operating System is HarmonyOS [ Officially ],harmony os,huawei new operating system, huawei harmony OS,](https://www.thedigitnews.com/wp-content/uploads/2019/08/Screenshot__2285_-removebg-preview-2-1-400x240.png)
![Huawei's New Operating System is HarmonyOS [ Officially ],harmony os,huawei new operating system, huawei harmony OS,](https://www.thedigitnews.com/wp-content/uploads/2019/08/Screenshot__2285_-removebg-preview-2-1-80x80.png) Phones5 years ago
Phones5 years agoHuawei New Operating System is HarmonyOS [ Officially ]
-

 News5 years ago
Belle Delphine bath water – Instagram Model Sells Used Bathwater For 30$ To Their Loyal Followers
-

 Tech5 years ago
Levi’s Bluetooth Jacket Lets You Control Your Smartphone


