
MS Outlook
How to Forward Email as ‘Attachment’ in Microsoft Outlook

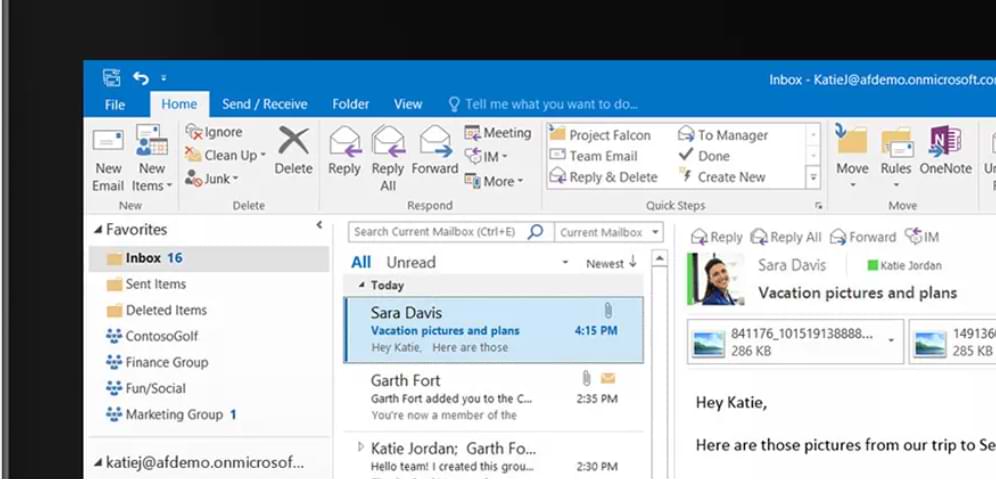
This time we will discuss a tutorial on how to forward the email as an attachment in Microsoft Outlook.
This tutorial is very useful to save you time instead of having to forward several emails one by one. You can send them all at once as attachments.
How to? Just take a look at the following reviews!
HOW TO FORWARD EMAILS AS ATTACHMENTS IN OUTLOOK
First, you can use the default desktop client from Microsoft Outlook or online web applications. Well, that will be discussed one by one in this tutorial.
1. Forward Email ‘Attachment’ Using Desktop Client
Before we begin, note that the ‘Desktop Client’ feature is not available in the Outlook smartphone app for iPhone, iPad, Android, and Outlook on smartphone browsers.
You can attach emails to new emails (or to emails to be replied to) using the native Microsoft Outlook desktop application for Windows and Mac.
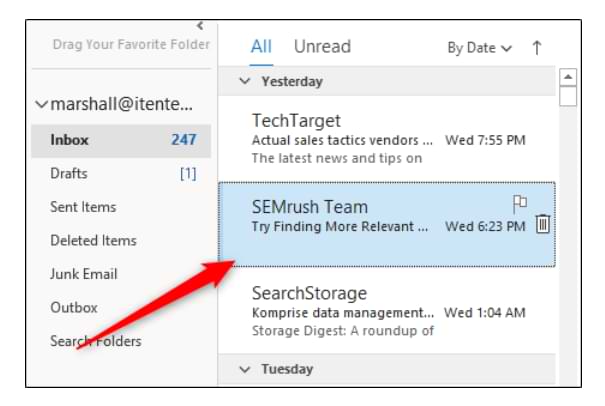
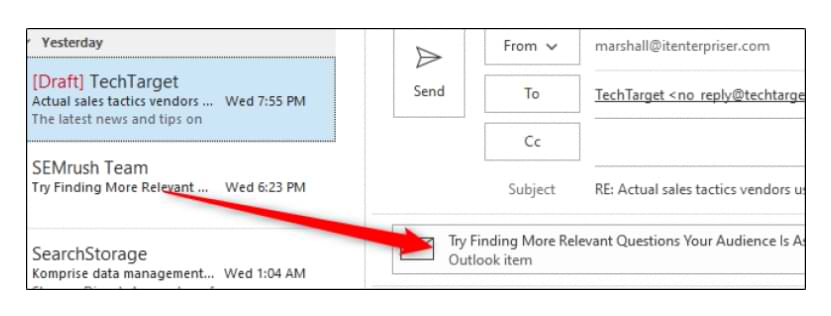
To do so, first launch “Outlook” first and then select the email you want to forward as an attachment by clicking on it in the email list.
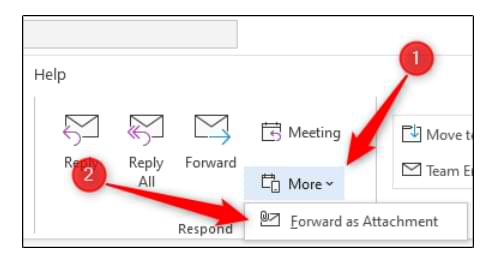
Next, in the “Respond” group of the “Home” tab, click “More”, then select “Forward As Attachment” from the drop-down menu.
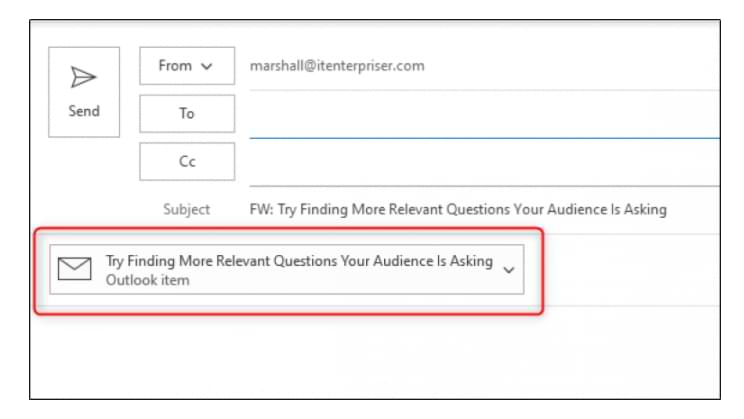
Once selected, a ‘new compose’ window will appear with the previously selected email as an attachment.
Or alternatively, if you want to reply to an email with another email as an attachment, click the email from the list of emails you want to reply to, then click the “Reply” button.
Next, “drag and drop” the email you want to attach to the body of the reply email from the list.
Your email is now attached to the reply email.
2. Forward Email as Attachment by Default
If you want Microsoft Outlook to send an email as an attachment to a new email by default every time you click the “Forward” button in the email, it’s very easy.
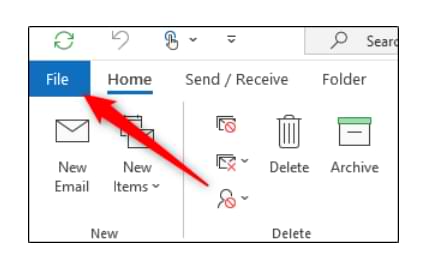
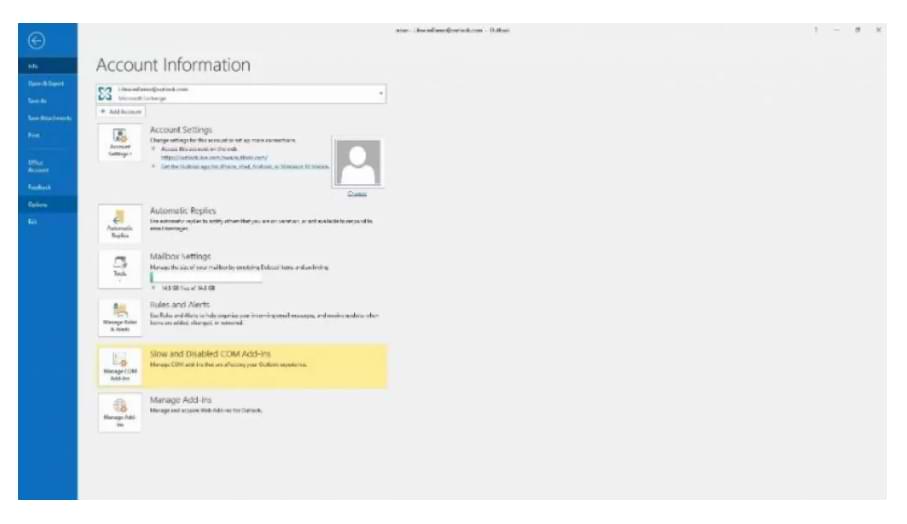
Open the “Outlook” application on your computer and click the “File” tab on the ribbon menu.
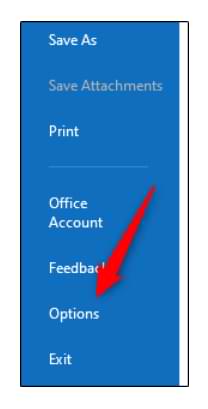
Select “Options” from the left pane.
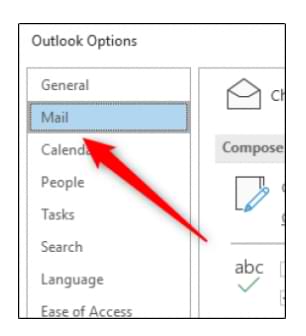
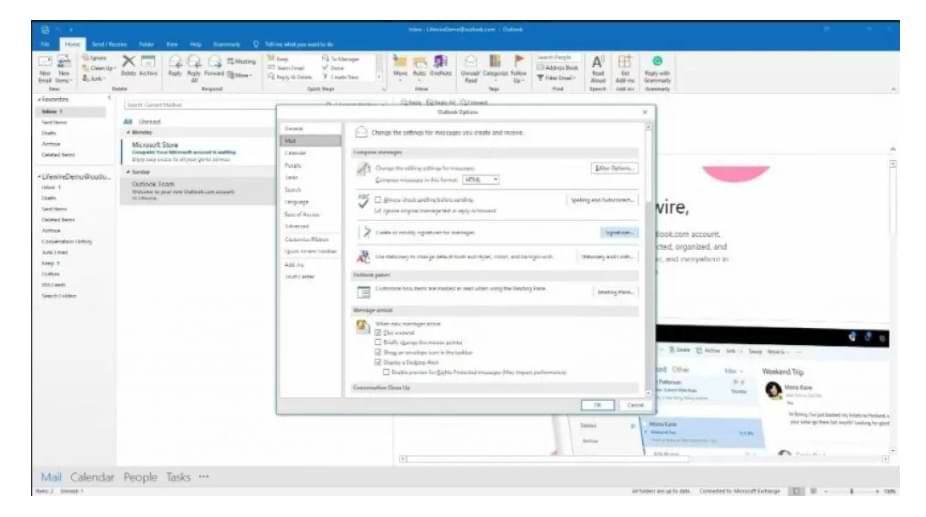
Later, the “Outlook Options” window will appear. In this section, please click the “Mail” tab.
Next, select the arrow next to the “When Forwarding a Message” option in the “Replies and Forwards” section, then click “Attach Original Message” from the drop-down menu.
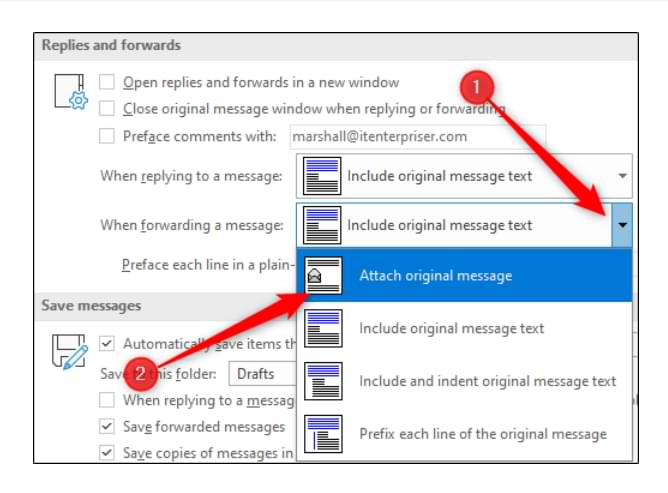
Finally, select “OK” in the lower right corner of the window to save changes.
3. Forward Email as Attachment using Outlook Web
If you prefer to use Outlook on the web instead of the Outlook app, you can still forward emails as attachments, but the steps are slightly different.
Unlike the desktop client in the Microsoft Outlook application, in this version of Outlook Web, there is no option that you can click to forward an email as an attachment in Outlook web.
But you can still do it using the “drag and drop” method.
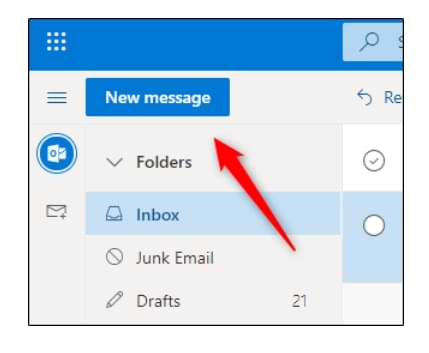
Open a web browser, navigate to the Outlook website, and then sign in to your Outlook account. After logging in, please click “New Message” in the upper left corner to create a new email draft.
Or select an email to reply to with “Email as an Attachment” by clicking on the email, then selecting “Reply”
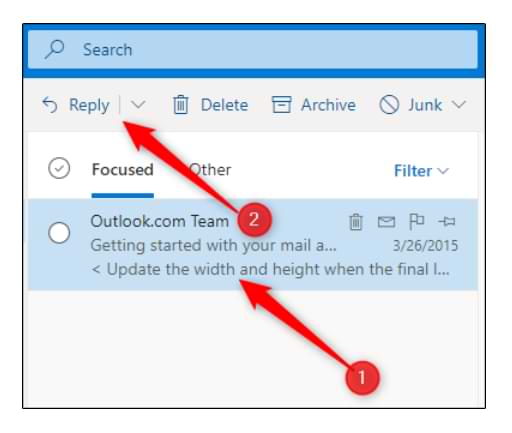
It doesn’t matter if you reply to an email or create a new one, the next steps are the same. Just find the email you want to add as an attachment from the email list. Then ‘drag and drop’ the email to the new email body.
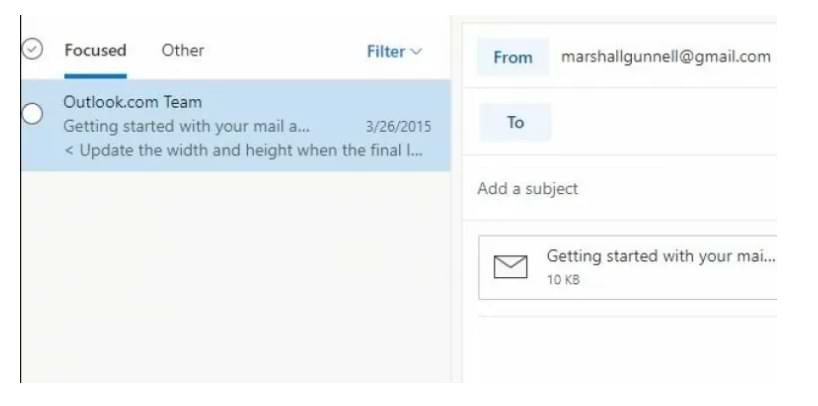
All that needs to be done now is add a recipient (if it’s a new email), then type a reply, and send the message.
Well, those are the steps on how to easily forward an email as an attachment or forward an email as an attachment in Microsoft Outlook. Hopefully, it’s useful, Goodguys.


Email is a crucial aspect of communication in the modern world, and with the rise of technology, the ability to schedule email sending has become more convenient and accessible. This feature is especially useful for people who are frequently on the go and need to communicate with others during specific hours when they may not be available.
Outlook Web App, also known as Outlook on the web, is a web-based email client that offers many features, including the ability to schedule emails for later sending. This means that you can compose an email and set it to send at a specified time, even when you’re not physically available to do so. In this article, we’ll take a deep dive into how to schedule an email in the Outlook Web App.
Step 1: Compose your email
To start, you’ll need to compose your email in the Outlook Web App. This can be done by clicking on the ‘New’ button in the top left corner of the screen. This will open up a new email window where you can input the recipient’s email address, subject line, and body of the email.
Step 2: Schedule the email
Once you’ve composed your email, it’s time to schedule it for later sending. To do this, click on the ‘Options’ drop-down menu and select ‘Delay Delivery’. This will open up a new window where you can specify the date and time you want the email to be sent. You can also set a reminder for yourself to follow up on the email if necessary.
Step 3: Set the delay options
In the delay options window, you’ll need to select the date and time you want the email to be sent. You can also specify a specific time zone if you’re working across multiple time zones. Additionally, you can set a reminder for yourself to follow up on the email if necessary.
Step 4: Send the email
Once you’ve set the delay options, simply click the ‘Send’ button. Your email will be saved in the Outbox folder and will be sent automatically at the specified time. You can check the status of your scheduled email in the Outbox folder, where you’ll also have the option to cancel or edit the email if needed.
In conclusion, scheduling emails in the Outlook Web App is a simple and convenient way to stay on top of your communication, even when you’re not physically available. By following these steps, you’ll be able to ensure that your email is sent at the right time and to the right recipient, without any hassle or inconvenience.
After upgrading in 2020, the Microsoft Outlook 365 program on Mac has two additional views to make calendaring easier.
One of them, you can create calendars and schedule events in Outlook 365 by setting a schedule in the My Day feature or through the RSVP system.
SCHEDULE EVENTS WITH THE MY DAY FEATURE
A Microsoft Outlook feature called My Day lets you see a quick overview of your daily schedule or other agenda, and add other events with just one click.
To view the My Day feature in the ‘Mail’ tab, click the ‘Show Task Pane’ button on the right, or select ‘View’ > ‘Task Pane’ from the menu bar.
To view it in another Outlook tab, click the ‘Show Task Pane’ button or select ‘View’ > ‘My Day’ from the menu bar.
To switch between views in My Day, click the three-dot icon at the top right.
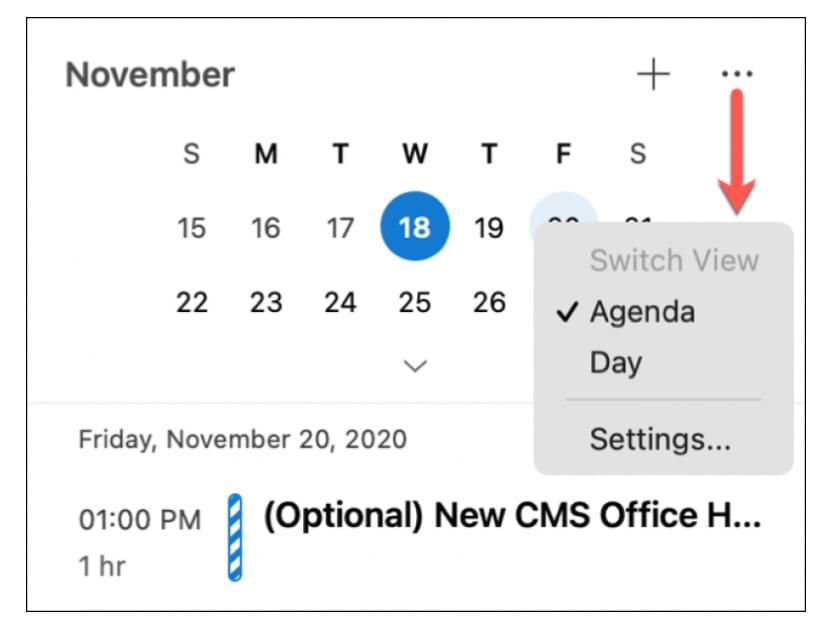
You can also select “Settings” from this menu to customize the calendar you want to display.

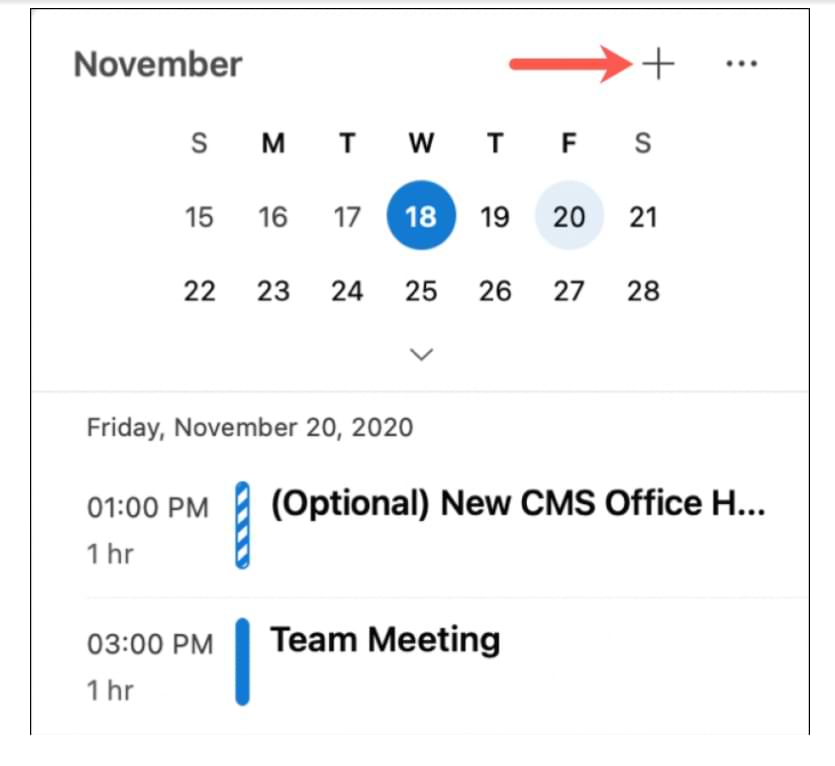
To add an event while you’re on My Day, click the plus sign (+) next to the three-dot icon.
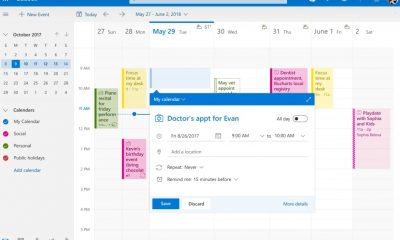
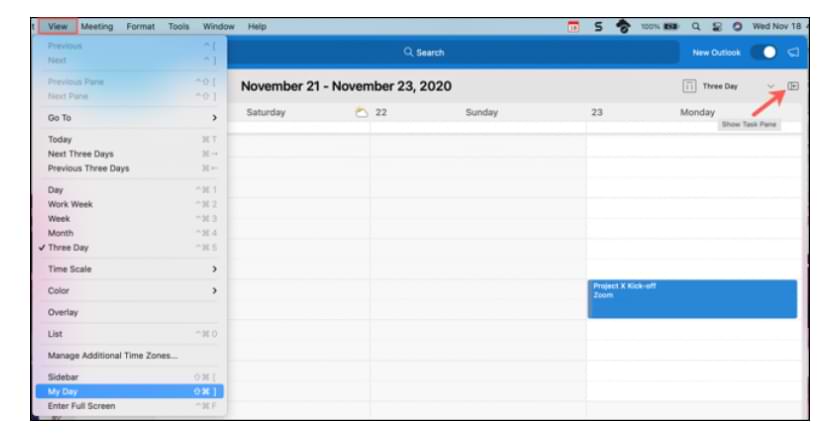
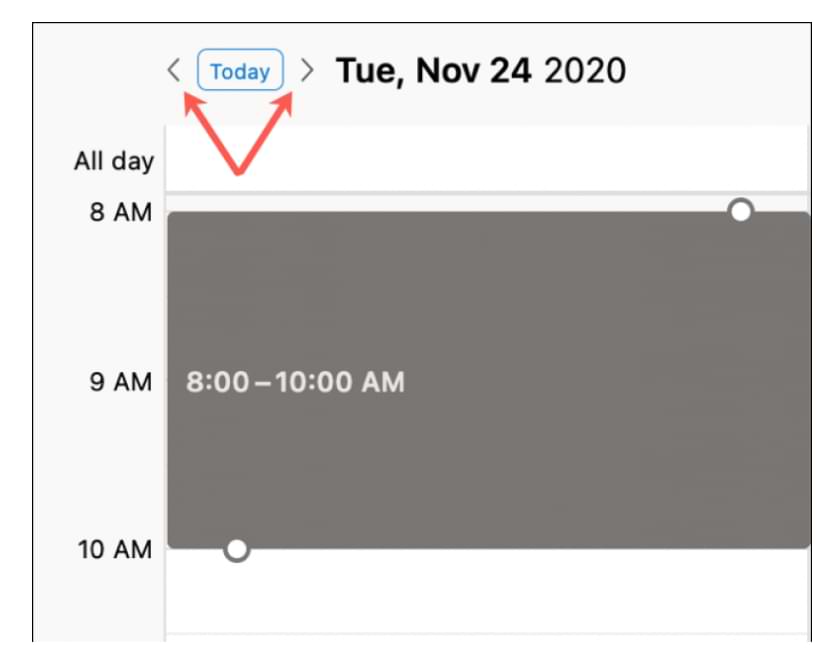
USE CALENDAR VIEW THREE DAYS AHEAD
If you want to see more than one day in your Microsoft Outlook 365 calendar, try the three-day forward view, as shown in the image below.
Click the “Calendar” tab to open your Outlook calendar. From there, select the drop-down arrow in the top right or click ‘View’ and then select ‘Three Day’ in the menu bar.

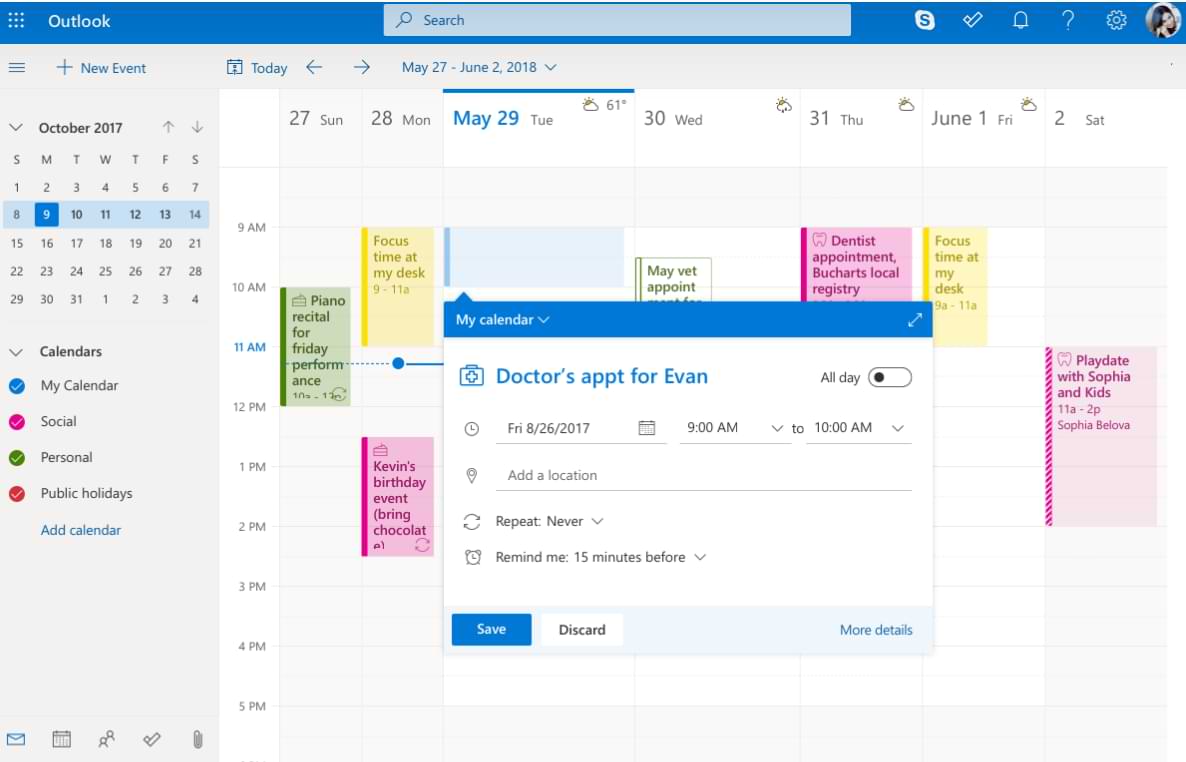
SCHEDULE EVENTS IN OUTLOOK CALENDAR WITH ADVANCED OPTIONS
With the advanced options in Microsoft Outlook, you can choose a time, check the availability of a schedule or agenda, and easily switch to another day.
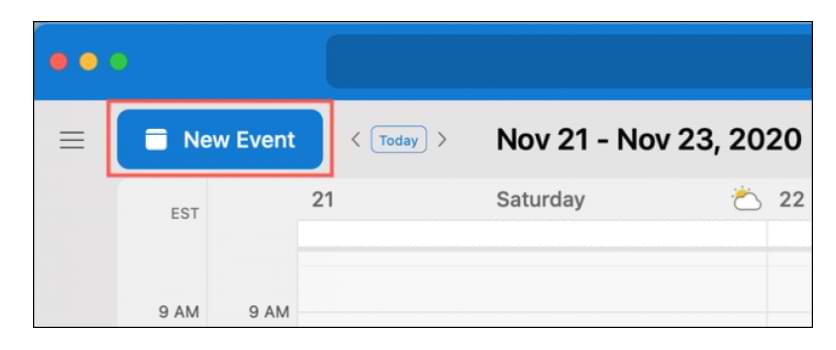
To create a new schedule or agenda, click ‘File’ > ‘New Event’ in the Outlook tab menu.
Alternatively, you can click the “Calendar” tab, then click “New Events” at the top left. You can then add all the event details on the left.
For an easier way of adjusting the time, use the calendar grid on the right.
‘Drag and drop’ time blocks wherever you want, then increase or decrease to fit the time frame.
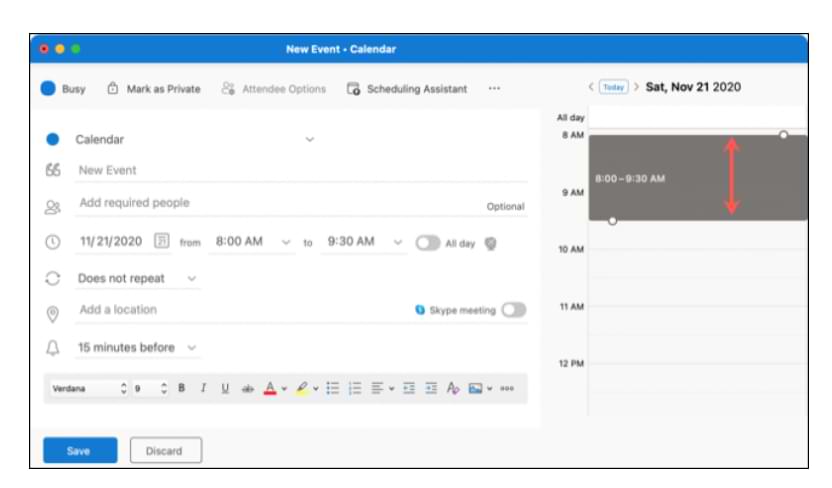
If you want to keep that time frame but also want to check other dates, use the arrow at the top next to the date.
Then, complete the agenda description and send the invitation to the person you want to address.
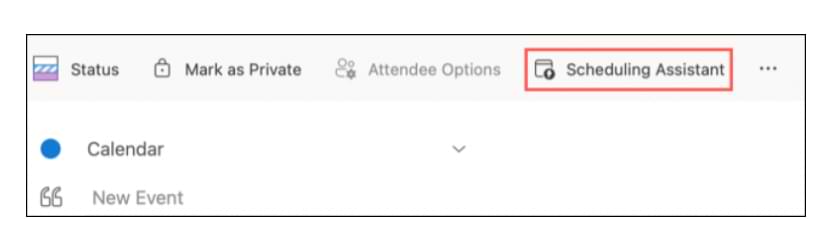
If you have multiple invitees, you can also still click “Scheduling Assistant” at the top of the event window to add mandatory and optional invites, including locations.
This allows you to check the availability of multiple participants at once. You can also drag time blocks and use double-sided arrows to lengthen or shorten the timeframe.
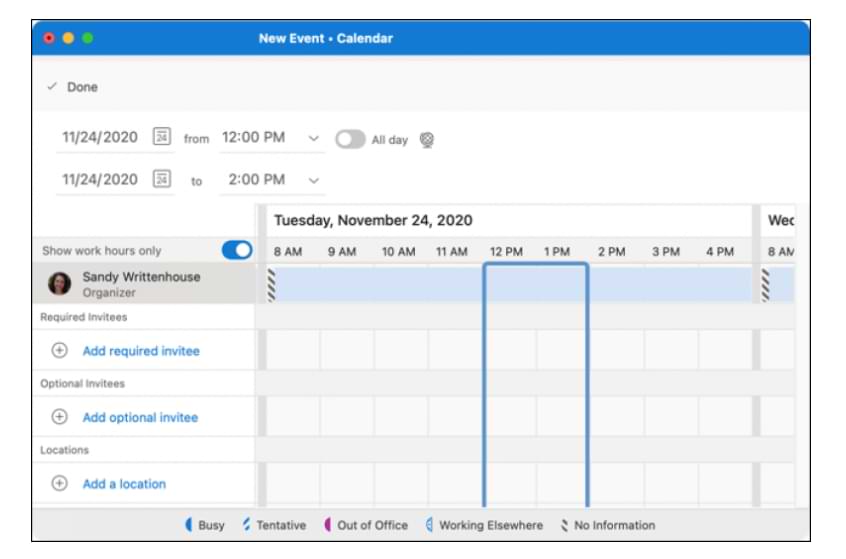
When you are done with the Scheduling Assistant, just click “Done” at the top left. Any details added or edited will be applied to the invitation.
You will then be returned to the invitation window, where you can complete anything else that needs to be done or simply click “Send”.
Well, those are the tutorial steps on how to use the calendar and schedule certain events or agendas in Microsoft Outlook 365 on Mac. Hope this helps, Good guys!
With Microsoft Outlook, you can send messages using a digital signature (signature). Not only that, Outlook also allows you to insert graphics or animations into the signature.
How to? This is what we will explain in the following article, a tutorial on how to add graphics or animations to Outlook email signatures.
HOW TO ADD IMAGE TO OUTLOOK SIGNATURE
Before starting the explanation, please note that the instructions in this article apply to MS Outlook 2019, 2016, 2013, 2010, and Outlook for Microsoft 365.
In Outlook, adding graphics or animations (animated GIFs, for example) to a digital signature is as easy as inserting an image into an email.
Here are the steps:
- Go to the ‘File’ tab.
2. Select ‘Options’.
3. In the ‘Outlook Options’ dialog box, select ‘Mail’.
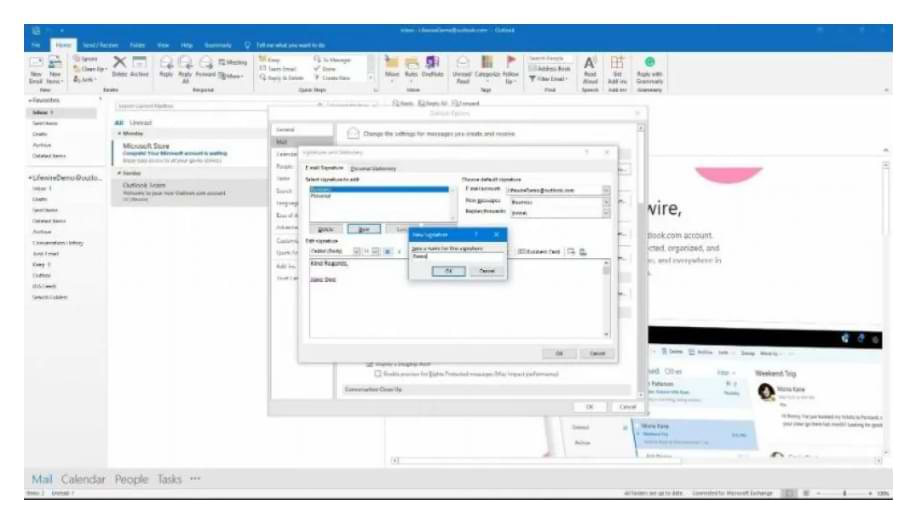
4. In the ‘Compose messages’ section, select ‘Signatures’.
5. In the ‘Signatures and Stationery dialog box, please open the ‘E-mail Signature’ tab and select ‘New’.
Note: If you want to add an image to an existing digital signature, select the signature you want to edit, then proceed to point 8 in this tutorial.

6. In the ‘New Signature’ dialog box, enter a descriptive name for the new signature and select OK.
7. In the ‘Signatures and Stationery dialog box, select the signature you want to edit, go to the ‘Edit signature’ section, and enter the text you want to include.
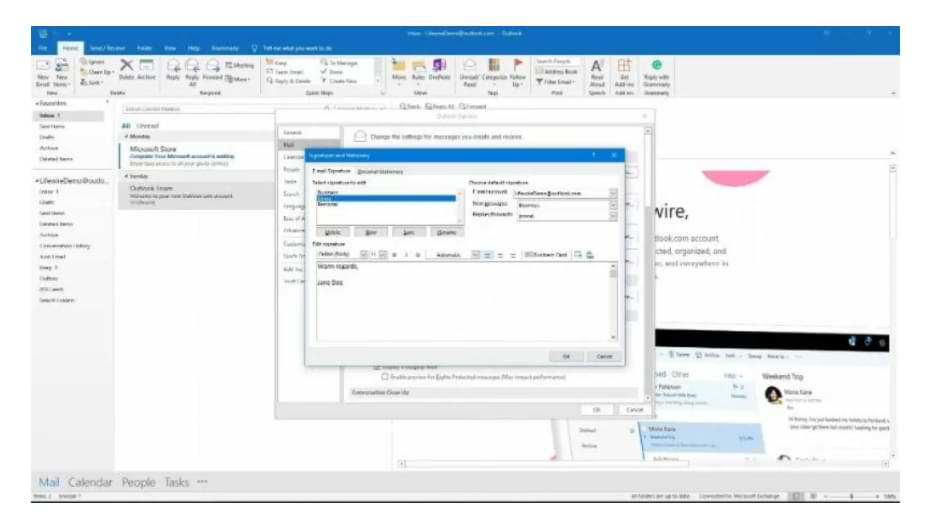
8. Position the cursor where you want to insert the picture into the Outlook signature.
9. On the Formatting toolbar, select ‘Insert Picture’.
Tip: In this case, adding an attachment will increase the size of the Outlook message/email. Choose a small image (less than 200 KB) to avoid taking up too much space in the email.
10. In the ‘Insert Picture’ dialog box, navigate to the folder containing the image file, then select the image file and select ‘Select’.
11. In the ‘Signatures and Stationery dialog box, select OK to save the signature.
12. In the ‘Outlook Options’ dialog box, select OK.
Well, that’s a short and clear tutorial on how to insert an image or animation into an Outlook email that you will send to make the message more attractive and visual.


Who Invented Lithium ion Batteries
SHARE More Imagine a world without smartphones, laptops, or electric cars. Crazy, right? These amazing devices rely on a powerful...


Who Invented SSD : A Journey From Invention To Innovation
SHARE More The dominance of Solid State Drives (SSDs) in modern data storage is undeniable. Their lightning-fast performance, superior reliability,...


Google Gemini: Your Super-Smart AI Sidekick (Made Easy!)
SHARE More Imagine a helpful friend who can write emails, translate languages, dream up creative ideas, and even write code!...

Who Invented Gorilla Glass for Mobile: Unveiling the Inventor and Its Impact
SHARE More In the ever-evolving landscape of mobile technology, Gorilla Glass has emerged as a revolutionary material, providing durability and...

The Evolution of Touch Screen Technology: A Journey into its Inventors and Innovations
SHARE More Touch screen technology has become an integral part of our daily lives, seamlessly blending with our smartphones, tablets,...

The Evolution of Memory Cards: Unraveling the Inventors Behind the Innovation
SHARE More In the fast-paced world of technology, memory cards have become an indispensable part of our daily lives. From...
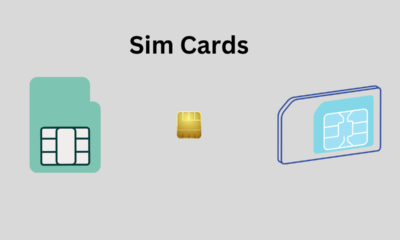

Who Invented Sim Card | The Origin and Inventor of the SIM Card: A Revolutionary Communication Breakthrough
SHARE More In today’s digitally interconnected world, the SIM card stands as a tiny yet indispensable component of our daily...


Who invented Walkie-Talkie | Exploring the Wonders of Walkie-Talkies: A Simple Guide for Beginners
SHARE More Walkie-talkies, often fondly referred to as “woki tokies,” are incredible communication devices that have stood the test of...


Who Invented Camera Lens : A Revolutionary Innovation in Photography
SHARE More The invention of the camera lens stands as a pivotal milestone in the history of photography, fundamentally altering...
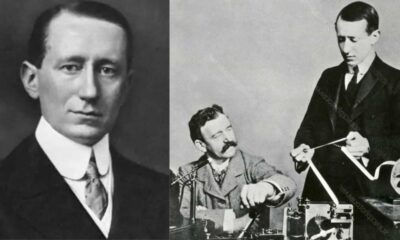

The Evolution of Radio Broadcasting: Who Invented Radio?
SHARE More Radio broadcasting has been a cornerstone of communication, entertainment, and information dissemination for over a century. It revolutionized...
-
 Phones5 years ago
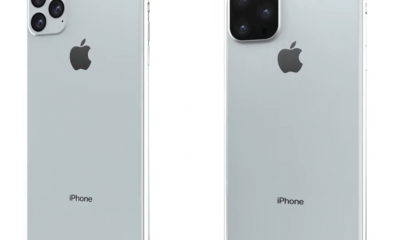
Apple iPhone 11 (2019) – Release, Info, Leaks, Rumors
-
![Huawei's New Operating System is HarmonyOS [ Officially ],harmony os,huawei new operating system, huawei harmony OS,](https://www.thedigitnews.com/wp-content/uploads/2019/08/Screenshot__2285_-removebg-preview-2-1-400x240.png)
![Huawei's New Operating System is HarmonyOS [ Officially ],harmony os,huawei new operating system, huawei harmony OS,](https://www.thedigitnews.com/wp-content/uploads/2019/08/Screenshot__2285_-removebg-preview-2-1-80x80.png) Phones5 years ago
Phones5 years agoHuawei New Operating System is HarmonyOS [ Officially ]
-

 News5 years ago
Belle Delphine bath water – Instagram Model Sells Used Bathwater For 30$ To Their Loyal Followers
-

 Tech5 years ago
Levi’s Bluetooth Jacket Lets You Control Your Smartphone