
Linux
How to install Ubuntu from USB
The world of operating systems is not just made up of Windows and macOS, on the contrary: there are many intriguing and free possibilities out there. In case you have not grasped the reference, we are talking about the family of open-source Linux OS, and in particular the popular Ubuntu distro, able to offer solutions potentially suitable for a large number of users. I know: there is often a bit of fear in approaching this type of operating system, but in reality, it must be said that the passing of the years has made everything much easier.
In fact, understanding how to install Ubuntu from USB has become easier than ever nowadays. The classic myth that is regularly narrated about the Linux world is that relating to the terminal and the dreaded commands related to the latter: in reality, a Linux distribution like Ubuntu has shown that it is possible to do essentially everything without too many problems even through a Free OS of this type. Yes, even for those who are not exactly PC experts.
On the other hand, Canonical’s OS integrates the Ubuntu Software Center digital store for downloading apps and already includes by default tools useful for browsing the Web and writing documents, just to mention some particularly common needs. Plus, it costs nothing to try (if not a little time): it’s all free and you may already have all the tools available to proceed. For the rest there are the quick indications below: I just have to wish you good reading!
Preliminary operations and minimum requirements
Before explaining in detail the procedure on how to install Ubuntu from USB, I would like to make some clarifications that may be useful to you.
First of all, if you are a novice user, you must know that nowadays there are tons of possibilities to try and install Ubuntu. In this guide, I will deepen the more classic method, the one that even those who have a little more than years on their shoulders know, that is the installation via USB (CD / DVDs are now outdated, so much so that even many recent PCs do not even have more than that type of reader, you have to take note).
However, I want to tell you that going through this method is not always the most comfortable option, especially for a person who has no experience in installing operating systems. Therefore, if you feel you are not quite ready, the invitation is to deepen my generic guide on how to install Ubuntu, in which I have analyzed all the options at your disposal, from virtualization to the Windows subsystem for Linux (I have also deepened the Mac question, which I will not deal with here).
In that case, it generally comes down to compromises in terms of performance, but it must be said that usually, a good number of users are satisfied with that type of experience, which is also useful if you want to continue using Windows at the same time. In short, if you have a decent PC and you don’t have too many needs, surely the aforementioned methods are much more comfortable than installing via USB (they really require a few clicks).
However, if you try to talk about it with a Linux enthusiast, the latter will most likely tell you that the real installation of Ubuntu is the one via USB, that it is not really anything complex and that there is even the possibility of testing the OS in live mode before installing it.
This is true: if you have a minimum of familiarity with the PC world, installing Ubuntu from USB will be anything but a titanic undertaking. However, I wanted to review even the simplest possibilities, certainly more suitable for those who do not feel completely safe or who need to do everything quickly and do not want to risk.
In fact, although everything has now been simplified to the maximum, during the installation procedure of Ubuntu from USB you still go to touch the disk partitions. You understand well therefore that there is always some risk in that type of operation. The advice is therefore to proceed in this way only if you really need it and if you understand what you are doing. In this context, I clearly do not take any responsibility in case of problems with the PC due to the irresponsible use of the information contained in this guide.
In any case, you will immediately understand if this procedure is right for you or not: I will immediately explain the preliminary operations that generally need to be implemented to complete the installation correctly.
Well, there are basically four issues: the first is the one related to the backup, which you may want to do if you care about the data contained in your PC. The second is related to setting the USB key as the primary drive for booting (generally you have to go through the BIOS or in any case for a boot-related menu available at boot time). The third question is related to the Secure Boot option, which you may want to set to Disabled from the BIOS. Finally, the fourth issue is that of Windows fast startup, which you may want to disable.
These are just some of the possible issues that you may want to investigate, as depending on the computer at your disposal, other aspects may emerge that need to be fixed. In short, if at this point you have not understood anything, it is probably good to follow the options I indicated above and see if you can use Ubuntu even without going through the installation from USB.
If, on the other hand, you have fully understood what is stated and are interested in proceeding via USB, I will immediately give you some more information regarding the preliminary operations. For example, in addition to consulting the official Ubuntu guidelines and possibly referring to the always-on forum for specific questions related to your PC, I give you a little more information on a quick start.
In fact, deactivating the latter on Windows may not be exactly immediate. Well, to carry out this operation from an all in all recent version of Windows, for example, Windows 10 or Windows 11, you just need to search for power management using the Start button, click on the Choose power scheme box and select the option Specify button behaviour power supply. After that, you may be prompted to press the Change settings currently unavailable item and move the Enable quick start option to OFF, then save the changes by pressing the Save changes button.
In short, now you know a little bit of everything there is to know about the preliminary operations and the general context. Clearly, there are a ton of variables at play, but at least you now have an overview of what generally needs to be done to prepare for this type of installation.
For the rest, you obviously need a USB stick to proceed. In this context, things have changed over the years: the classic 2GB pen is now no longer enough: it is good to use a USB stick of at least 4GB, otherwise, you may encounter some problems during the procedure. In this context, you may want to check out my tutorial on the best USB sticks (which can lead you to make a more informed purchase).
Net of this, clearly your PC must meet Ubuntu’s minimum requirements, which you can find below.
- Processor: dual-core x86 at 2GHz or higher;
- RAM: at least 2GB (4GB is recommended);
- Disk space: 25 GiB;
- Video card: the resolution of at least 1024 x 768 pixels, as well as 3D acceleration. At least 128 MiB of memory (256 MiB and 1280 x 1024 pixels are recommended);
- Other: Internet connection to download installation and BIOS files capable of booting from USB.
In any case, Ubuntu is now able to support a little bit of all available hardware configurations, so you shouldn’t run into any particular problems. However, clearly before proceeding you may want to take a look at the components mounted by your PC, in order to verify that the above requirements are met. In any case, I may have already given you indications on where to ask your specific questions (see the forum mentioned above).
For the rest, it must be said that by performing a dual boot, or by placing Ubuntu alongside Windows (and obviously reserving the right space for the operating system linked to the Linux world), Microsoft’s OS data will not be deleted (at least if you follow all the instructions correctly), so from that point of view you can rest assured (although it’s always good to make a backup, as I said earlier).
How to install Ubuntu on USB from Windows
Now that you are well informed about the preliminary operations and minimum requirements, we can move on to the actual procedure for installing Ubuntu from USB. In this case, I will give a practical example relating to a PC that already has Windows installed, but in reality, the steps to be taken are essentially those even if you have a computer without an OS, as I will explore in more detail in the tutorial. Below you can learn more.
Ubuntu download
The first topic to be addressed is clearly that of the Ubuntu download. In fact, to proceed with the installation you need to have an ISO image file linked to the operating system.
Finding it is very simple: once you reach the appropriate page of the Ubuntu official, all you have to do is select the Ubuntu edition and choose between the Desktop and Server options for what concerns the second drop-down menu, then pressing on the Start Download button to start the download. Let me give you some simple advice regarding this selection: if you are a simple user, you can safely leave everything as it is and proceed with the download.
However, if you have specific needs you can clearly make the choice according to your needs, for example by pointing to the LTS version of Ubuntu ( Long Term Support ), supported for 5 years instead of 9 months, if you are a user who wants to focus more on stability than about the latest features available. In any case, once the download is complete via your browser, you will have an ISO image file available.
Creating the Ubuntu USB stick
After finding the Ubuntu installation file, it is time to proceed with the creation of the USB key, the tool you will need to then have the OS available.
I would say that the time has come to take your trusty USB stick of at least 4GB and insert it into the USB port of your computer (preferably already formatted in FAT32 ). Obviously, the latter must not contain important files, as the procedure you are about to carry out will delete everything inside the key.
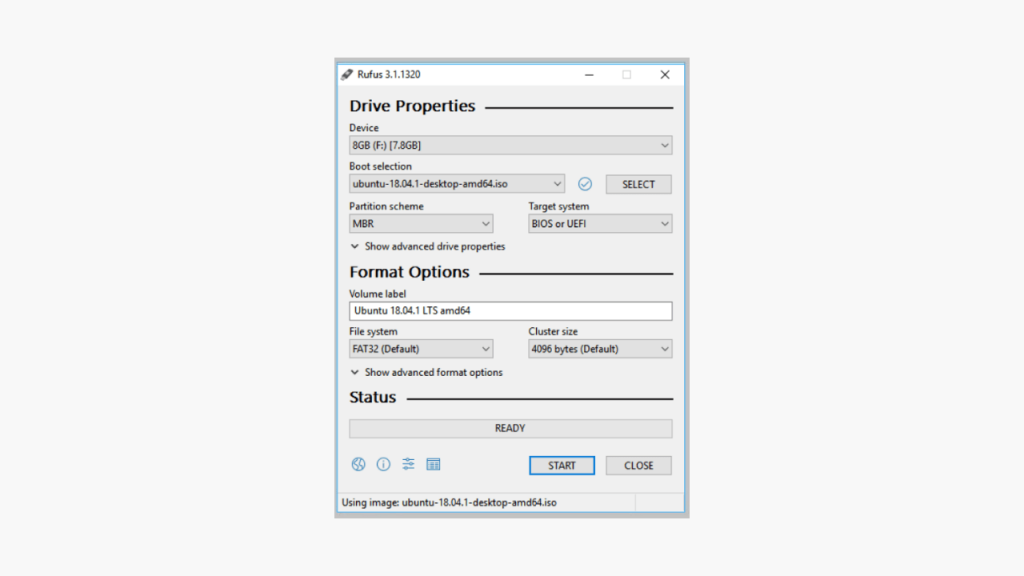
In any case, I try to make the installation procedure as simple as possible for you, by going through a free program called Rufus, which can be booted on Windows without even installing it. To proceed, go to the official website of Rufus and press on the item Rufus 3. xx Portable. Subsequently, open the file obtained, first pressing the Yes button and then choosing whether or not to check for updates .rufus-xx.exe
Once you are in front of the main Rufus screen, it’s all a breeze: just check that the right USB key is selected, press the SELECT button and choose the ISO image file you downloaded previously. Then, if you have no particular needs, you can safely avoid changing the other options and click on the START button, possibly changing only the volume label (the name given to the USB key) and pressing in succession on the OK, Yes and OK keys to confirm your will, finally waiting for the end of the operation.
Note: if you are wondering, for example, how to install Ubuntu from USB UEFI, the important thing is to select the BIOS or UEFI option in the Target System menu. Also, in case of any problems, I recommend that you take a look at the Ubuntu guidelines related to UEFI technology.
Ubuntu installation
Now that you have a USB stick with Ubuntu, it’s time for the final phase, that is, the actual installation of the OS on your computer.
Generally, the thorniest issue for a novice user is that of booting from USB. Put simply, you have to tell the computer to give priority to the key over, for example, the hard drive. Unfortunately, I cannot go into more detail about the procedure, as each computer model is a story in itself.
However, generally, this is nothing more than restarting the computer, pressing the right key at boot time and selecting the appropriate option from the boot menu or possibly setting priorities from the BIOS, then applying the changes. In short, you may want to consult my tutorial on how to enter the BIOS, but if you have a minimum of familiarity with the PC world you should not have too many problems in proceeding (also because I had already warned you in the preliminary chapter.
For the rest, once you have successfully booted from USB and selected the Ubuntu option, as well as after waiting for the system to carry out all the necessary checks (for example, those relating to the file system), you will access the main screen relating to the installation of the OS.
I advise you to select the English option on the left, in order to proceed in this language. Otherwise, you will notice that there are two possibilities: Try Ubuntu and Install Ubuntu. In the first case, you can test the operating system before even installing it on the SSD / hard drive, in order to carry out various tests and also try to understand if the operating system is actually for you.
In any case, returning to your goal, that is to install Ubuntu on the PC, once you press the Install Ubuntu button, the procedure becomes a breeze, as it is guided and in English. In short, from here on you could also easily proceed by yourself following the instructions that appear on the screen, but don’t worry: I will give you a hand until the end.
Well, now you will be asked to set the keyboard layout (you can always select English) and click on the Next button. At this point, you will have to make a choice: if you usually use, for example, office programs and multimedia players, you can focus on the Normal installation option, while if you simply need a browser for Web browsing and little else you can safely proceed by selecting a Minimal Installation.
At this stage, among other things, you can also choose whether to install additional third-party software (concerning, for example, the graphics area) and whether to download updates relating to the OS during installation (obviously you must have an Internet connection in this case) Once you have made all the appropriate choices, you can press the Next button to continue.
At this point, there are crossroads related to dual booting. Choose, therefore, whether to possibly install Ubuntu alongside Windows or whether to proceed individually with the OS linked to the Linux world (thus deleting the disk). In case you were wondering, yes: the Other option can come in handy if you need to manually set the partitions (I recommend that you only consider this possibility if you are an expert user after all).
In any case, once you click on the Install button, present at the bottom right, as well as select the location where you are (for example, Rome) and click on the Next button to confirm, you will be prompted to quickly set other options such as name, username, computer name, password and password confirmation. There is also the possibility to choose whether to always ask for authentication: then press the Next button to continue.
At this point, it’s done: you just have to leave the computer to carry out all the necessary operations relating to the installation. You will understand when everything is finished thanks to the appearance of a specific message on the screen. To conclude everything, you just have to click on the Restart now button, remove the USB key from the appropriate port and select the Ubuntu option from the appropriate selection menu (in case of problems with the latter, you may want to consult my guide on how to reset GRUB ).
Perfect, after the first start of the operating system, you will access the Ubuntu desktop (the equivalent of the Windows desktop, so to speak) and you can safely start using the Canonical operating system. Sure, you may be asked to do some other quick final configuration (for example, relating to Livepatch, which allows you to update your PC without rebooting it), but then you are free to delve into the Linux world.
Great: You now have Ubuntu at your disposal. You can therefore start to get familiar with the simple interface but to really start using the operating system properly, I suggest you consult my guide on the best programs for Ubuntu, in order to understand where to look also from that point of view. view.
How to install Ubuntu from USB on PC without an operating system
How do you say? To save a bit, did you buy one of the so-called No-OS PCs that are now also found on online stores such as Amazon and were you thinking of installing Ubuntu as an operating system? No problem, I immediately analyze the matter.
In this case, simply follow the directions I indicated in the previous chapters since everything is essentially the same. Simply, once you have created the USB stick with Ubuntu, just insert it into the appropriate port on your PC, press the button to boot from the stick (or enter the BIOS and change the priorities, if necessary).
After that, the installation procedure is exactly the same as the one I described in the dedicated chapter. In short, very few changes if the part base is a Windows computer or a No-OS (except of course that in the latter case there will be no option for dual boot).
In any case, obviously, the procedure varies according to your needs of the computer at your disposal, but now you know a little bit of everything there is to know on the matter. Among other things, if you want to deepen the subject at a general level, you can refer to my tutorial on how to install an operating system. You may also be interested in taking a look at my guide related to the best Linux distros, in order to have a broader awareness of what the open-source world offers (and therefore go beyond Ubuntu).
image:- Ubuntu

Flash format is an activity that aims to empty the files stored in it. This method is done for various reasons, such as wanting to copy new files, removing viruses, and others.
Flash format in Linux is not much different from the flash format in Windows, and it’s just that there are various ways of formatting that you can do. Depending on your understanding of which one is easy, you can use your method.
In this discussion, I will use two of the most common and easy-to-use ways to format a flash drive on Linux, namely how to format a flash drive manually and via the Terminal. The Type of Linux that I use here is the desktop version of Ubuntu 16.04.
How to Format Flashdisk on Linux Ubuntu
( I. ) Format Flash Disk Manually
The one most often used by users is how to format the flash here manually I use. The steps are as follows.
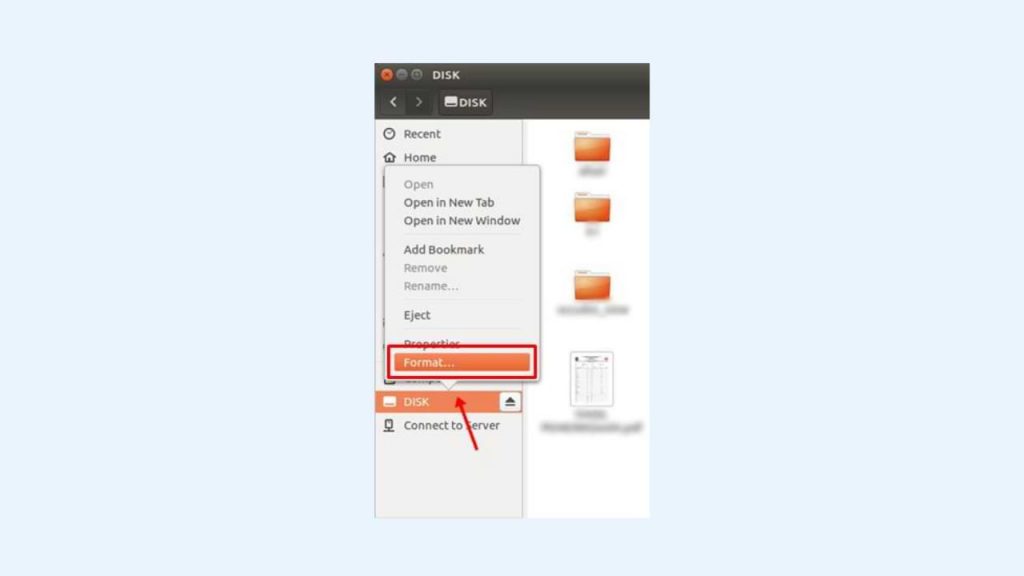
1. Open your file explorer or directory. Click on the flash drive that you want to format to see if your flash drive is legible, what it contains, and are you sure you want to format it.
2. After that, right-click on your flash device, as shown in the picture—Click Format to empty your flash.
3. Next, there are options ( Erase, Type, and Format ) that you can adjust to your needs on this Volume Format. You can follow the default options as shown in the picture.
- I select ‘ Don’t overwrite existing data (Quick )’ in the Erase section. This option makes the formatting process faster.
- I choose the FAT format for Type here, but you can select another such as NTFS.
- Then, write a new name for your flash device in the Name field.
- Next, click the Format button.
4. After that, a confirmation will appear again to make sure you do the correct format of the flash. At this stage, the Type of your flash device will be displayed as indicated by the arrow in the image. The flash that I formatted is branded HP and has a capacity of 16GB. Click the Format button to start the flash format process.
5. Format your flash drive has been successful. You can check it by re-opening your flash directory and seeing that the flash drive is empty.
( II. ) Format the flash drive via Terminal.
In addition to manually, you can format the flash via the Terminal. How to? Follow these steps.
1. First, you can check the contents of your flash drive first to make sure you format it. Here, the name of my flash is My FD.
2. Open your Terminal. You can use the shortcut by pressing the keyboard’s Ctrl + Alt + T keys. Type the command:
sudo fdisk -lThe above command aims to find out the address of your flash drive. In the command, use the word sudo, where the Terminal will ask for your password input first. Enter your password; then, the Terminal will display the specifications of the device installed on your computer.
The device that is connected is the flash that we will format. You can ensure the device is your flash drive by observing its size. The example image above says 15.1 G, which means that the flash that I will format is filled with 15.1 GB. Then, remember the address. The address is listed in the Device column, wherein the image above it says /dev/sdb1.
3. Next, use the flash address we know earlier to run the umount command. This command aims to release the flash that is currently associated. You can see the related flash disk in the file explorer, wherein the flash name has an arrow button, as shown below.
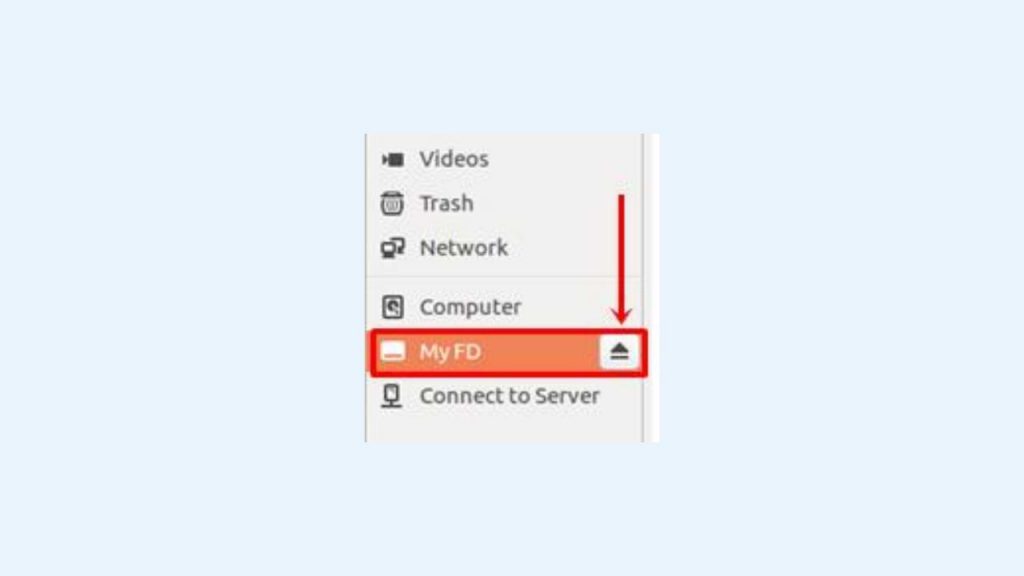
Use the command below to remove your pen drive.
sudo umount /dev/sdb14. Next, you can type a command like the one below to format the flash drive.
sudo mkfs.vfat /dev/sdb1There is the word ‘ vfat ‘ in the command where FAT states the flash format after formatting. You can replace it with NTFS, hfs, ext2, ext3, ext4, and others according to your needs.
5. Finally, your flash is successfully formatted. To check, please open your file explorer and prove your flash drive is empty.
Before formatting the flash drive, make sure there are no important files that will be deleted. Back up your precious data if you are worried about losing your files. That’s how to format the flash on Linux Ubuntu easily. Give your feedback in the comments column below. Thank you.

For those who don’t know, Microsoft Teams is now available as a Multi-Platform application on almost all operating systems, be it Windows, Mac, Linux, Android or iOS.
Now about this, we will summarize the short steps on how to Install Microsoft Teams on Linux. As usual, here, I will use Elementary OS as my mainstay Linux OS.
Here are the short steps.
Step 1. First, please open the Microsoft Teams site.
Step 2. Please download the Installer file from Microsoft Teams; please adjust it to the Linux distro you have, DEB for Ubuntu, Debian and all their descendants, and RPM for Fedora, CentOS and all their siblings.
Step 3. After the file is downloaded, please open the file, and if your Linux already has an app installer, the steps will be easier because we click install.
But if it doesn’t exist, we can use the classic steps by using Terminal. Open Terminal > Go to Directory Download > Then type the following command:
sudo dpkg -i <namafileinstaller>Exactly as in the picture above, after typing the command, you need to enter your root password, and then the installation will run until the Microsoft Teams application is installed.
Well, please try, guys; it’s easy, isn’t it? I hope this article is useful.
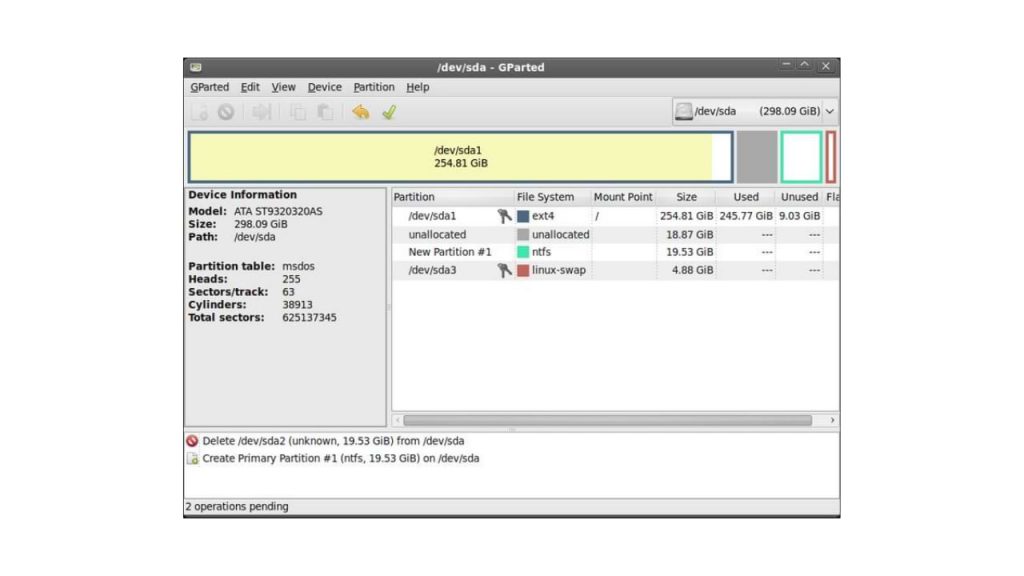
Have you ever heard of GParted? This name may still sound less familiar to your ears, especially for those who use the Windows operating system because GParted is intended for Linux users.
Although it sounds less familiar, this application is quite a lot of people who use it. One of the reasons is because GParted offers ease of operation. Even people new to using it tend not to experience complicated problems even though it is the first time they try it.
What Are the Features of GParted?
GParted is an application that can run on both x86 and x64 computers with operating systems such as Windows, Mac OS, and Linux with a minimum RAM size of 256 MB. From these specifications, we can know that this application is light because it only requires a RAM capacity of only 256 MB.
Some of the features that make GParted one we recommend include:
- Create or delete partitions
- Format partition
- Resize partition
- Mounting and unmounting partitions _
- Label
- Checking storage conditions
- Enable and disable Swap (this feature can be used on devices with Linux OS)
- New UUID
- and others
You can use all of these features according to your needs. Using the features in GParted is not too difficult because the instructions are clear. Also, because GParted is GUI, it makes the instructions easy to understand.
How to Use GParted
- As usual, you download the GParted application.
- There will be an ISO file; then, you burn the file.
- Restart the computer and make sure that the boot CD-ROM is in the first place
- GParted is ready for you to use
- You can click Resize or Move if you want to adjust the size of the hard disk.
- You drag across the partition towards the left. Don’t forget to pay attention to the words New Size to create a new size and Free Space Following, the new partition you are using.
- Then you press the Resize or Move button to start this process
- You click the new partition in the Filesystem section. Then select ext3 and label ‘/.”
- Click the Add button, then apply to begin the partition change process.
- Restart the computer and see the size of the partition on the hard drive now
- Don’t forget to backup your data first before using GParted.
For your information, several versions of the Linux operating system that can use GParted include Fedora, Ubuntu, Debian, and Open Suse. GParted stands for Gnome Partition Editor, an application with a GUI or Graphic User Interface.
This application is used for storage management, namely SSD or hard disk. Functions of GParted as found in the Partition Wizard in DLC Boot for Windows OS. At the beginning of its creation, this application was intended for Linux OS.
However, now you can download GParted and use it for Windows OS. By using this application, you can edit, resize, or create or delete partitions on the storage media on your computer or laptop.

Who Invented Lithium ion Batteries
SHARE More Imagine a world without smartphones, laptops, or electric cars. Crazy, right? These amazing devices rely on a powerful...

Who Invented SSD : A Journey From Invention To Innovation
SHARE More The dominance of Solid State Drives (SSDs) in modern data storage is undeniable. Their lightning-fast performance, superior reliability,...


Google Gemini: Your Super-Smart AI Sidekick (Made Easy!)
SHARE More Imagine a helpful friend who can write emails, translate languages, dream up creative ideas, and even write code!...

Who Invented Gorilla Glass for Mobile: Unveiling the Inventor and Its Impact
SHARE More In the ever-evolving landscape of mobile technology, Gorilla Glass has emerged as a revolutionary material, providing durability and...

The Evolution of Touch Screen Technology: A Journey into its Inventors and Innovations
SHARE More Touch screen technology has become an integral part of our daily lives, seamlessly blending with our smartphones, tablets,...

The Evolution of Memory Cards: Unraveling the Inventors Behind the Innovation
SHARE More In the fast-paced world of technology, memory cards have become an indispensable part of our daily lives. From...

Who Invented Sim Card | The Origin and Inventor of the SIM Card: A Revolutionary Communication Breakthrough
SHARE More In today’s digitally interconnected world, the SIM card stands as a tiny yet indispensable component of our daily...

Who invented Walkie-Talkie | Exploring the Wonders of Walkie-Talkies: A Simple Guide for Beginners
SHARE More Walkie-talkies, often fondly referred to as “woki tokies,” are incredible communication devices that have stood the test of...


Who Invented Camera Lens : A Revolutionary Innovation in Photography
SHARE More The invention of the camera lens stands as a pivotal milestone in the history of photography, fundamentally altering...

The Evolution of Radio Broadcasting: Who Invented Radio?
SHARE More Radio broadcasting has been a cornerstone of communication, entertainment, and information dissemination for over a century. It revolutionized...
-
 Phones5 years ago
Apple iPhone 11 (2019) – Release, Info, Leaks, Rumors
-
![Huawei's New Operating System is HarmonyOS [ Officially ],harmony os,huawei new operating system, huawei harmony OS,](https://www.thedigitnews.com/wp-content/uploads/2019/08/Screenshot__2285_-removebg-preview-2-1-400x240.png)
![Huawei's New Operating System is HarmonyOS [ Officially ],harmony os,huawei new operating system, huawei harmony OS,](https://www.thedigitnews.com/wp-content/uploads/2019/08/Screenshot__2285_-removebg-preview-2-1-80x80.png) Phones5 years ago
Phones5 years agoHuawei New Operating System is HarmonyOS [ Officially ]
-

 News5 years ago
Belle Delphine bath water – Instagram Model Sells Used Bathwater For 30$ To Their Loyal Followers
-

 Tech5 years ago
Levi’s Bluetooth Jacket Lets You Control Your Smartphone