
How-To
How To Reset Windows 10 Password
Change Windows password easily

Reset Windows 10 password can basically be done in several ways and has the same function.
Password has a function for protection, but if the password is no longer safe then you must immediately change the password.
Windows 10 users can add a password or not on the device they are using and can change the password at any time.
Then how? Here are some ways to reset Windows 10 passwords that you can try!
HOW TO RESET WINDOWS 10 PASSWORD
There are several ways you can do this, but the most common is through settings. Why? Of course, because this is the easiest way for everyone.
Here’s an explanation of each step:
- Open settings via Start
- Then select the Accounts menu.
- The next step is to select the Sign In the menu on the left.
- See also on the right side in the Password section.
- Select the Change button to change the password.
- Enter the previously used password.
- Click Next.
- Enter a new password in the New Password field
- When it is done, click Next.
- continue by clicking Finish.
Already, it really won’t take long because it’s only a few steps. The use of this password looks trivial but it is very important, you know.
In addition to this method, there are several other methods that are more or less the same and this method is the easiest.
Reset Password with Shortcut

There is one more way that might help you, namely using shortcuts. For more clarity, here is the full review.
- Press Ctrl + alt + delete simultaneously.
- A dialog box will appear and a closed screen will appear.
- Then select Change a Password.
- Continue by adding the account name in your Local Windows.
- Enter the old password.
- Enter a new password.
- Done!
Isn’t it the same? Yup, it’s the same, just different in a few steps. Make sure you remember or write down your new password.


Why your photos can be blurry (blurred) There are several factors that cause them, including: When taking photos it is unstable (shaky), the object you are photographing is a moving object, the camera lens is dirty, the camera application is not functioning properly and several other causes.
How to Fix Blurry Pictures Taken from Android Phone:
1. Use an app to fix blurry photos
Most image editing apps include a useful function to sharpen photos, this feature you can use to improve your Android photos.
As for the method, I have discussed it in a previous article here
Or you can also try other apps like VanceAI and Neural. love, Let’s Enhance, and MyEdit
2. Take precautions so that the photos are not blurry
Tips for preventing blurry images on Android phones, there are several things you can try to prevent this, including:
- Clean your phone lens
- Take photos in better lighting conditions
- Delete the Camera application cache, go to the menu: Settings > Storage > Devices > Cached data > Clear cached data > OK.
- As much as possible, avoid excessive zoom functions when taking photos on an Android cellphone camera.

As a music streaming service, Spotify has revolutionized the way we listen to music. One of its most exciting features is the AI DJ, which creates custom playlists based on your music preferences. However, sometimes users encounter an issue where the AI DJ feature is not showing up. In this article, we will go through a step-by-step guide on how to fix this issue.
Step 1: Check for Updates
The first thing you should do is check if your Spotify app is updated. If not, update it to the latest version. This may resolve any glitches or bugs that are causing the AI DJ feature to disappear.
Step 2: Clear Cache
Clearing the cache on your Spotify app may also help resolve this issue. To do this, go to your app settings and select “Storage.” From there, tap on “Clear Cache” and restart your app.
Step 3: Disable Battery Saver
Sometimes, battery saver settings can interfere with the app’s performance. To disable the battery saver, go to your phone’s settings and select “Battery.” From there, disable any battery-saving modes that are enabled.
Step 4: Check the Internet Connection
Make sure that you have a stable internet connection. If your internet connection is slow or unstable, the app may not be able to load the AI DJ feature.
Step 5: Check Country Settings
Spotify’s AI DJ feature is not available in all countries. If you’re using the app in a country where this feature is not available, it may not appear on your app. You can check the list of countries where the AI DJ feature is available on the Spotify website.
Step 6: Check the Subscription
The AI DJ feature is only available to Spotify Premium subscribers. If you’re using the free version of the app, you may not be able to access this feature.
Step 7: Reinstall the App
If none of the above steps work, you can try uninstalling and reinstalling the app. This will reset the app to its default settings, which may resolve any issues that were causing the AI DJ feature to disappear.
Step 8: Restart Your Device
If the issue persists, try restarting your device. This can help fix any software issues that may be causing the problem. Here’s how to do it:
- Press and hold the power button on your device.
- Tap on the “Restart” option when it appears on the screen.
- Wait for your device to restart, and then try opening the Spotify app again.
Step 9: Contact Spotify Support
If the issue persists after trying all the above steps, it’s time to contact Spotify support. You can reach out to them through their website, and they will guide you through resolving the issue.
Conclusion
Spotify’s AI DJ feature is a great way to discover new music based on your preferences. However, it can be frustrating if it’s not showing up on your app. By following the steps outlined above, you should be able to resolve the issue and get back to enjoying your music. Remember to check for updates, clear cache, disable battery saver, check internet connection, country settings, and subscription, and reinstall the app. If all else fails, don’t hesitate to contact Spotify support.

The steam error code e84 problem usually occurs when we are about to log into the Steam platform, this error is also accompanied by Something that went wrong while attempting to sign you in.
If you are currently experiencing the same error. So in this article, we are going to provide you with the repair solution with the simplest way to fix it.
1. Delete Temporary Files
Temporary Files on your computer can sometimes make Steam run improperly. One is the steam error code e84, so try deleting temporary files from your computer. To do so, follow these steps:
- Press the Windows key + R then type the command %temp% and press the Enter / OK key
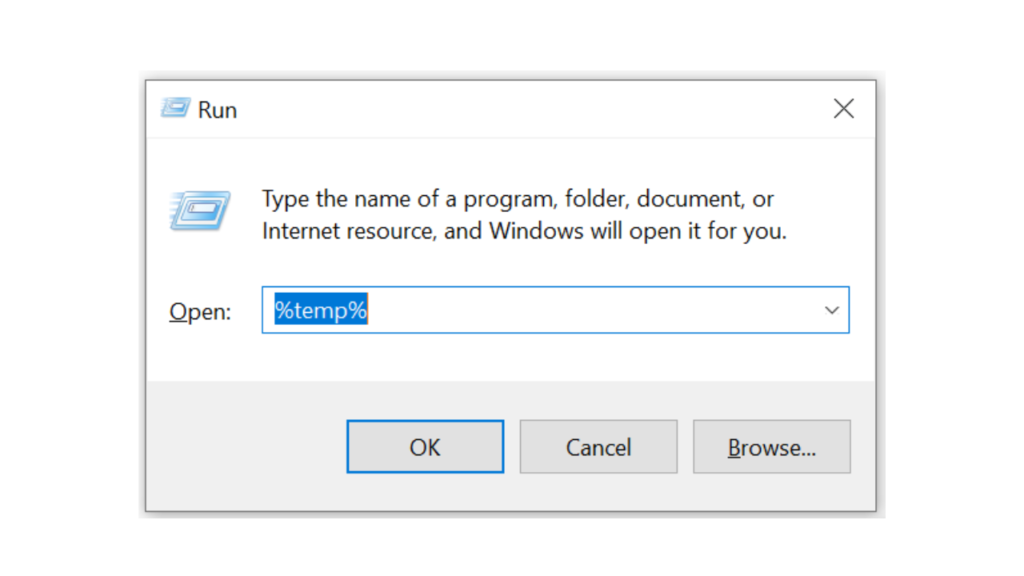
- Then delete all files and folders in the temp folder
- After that, try restarting your computer, and try opening Steam, is the error code E84 still there?
Deleting all of these folders will not cause errors or damage to the computer/programs on your computer, because all the files in this temp folder are temporary files that are no longer needed.
2. Update the Steam Application
Check if there is an update available for the steam application, if there is, please update immediately. And after the update is complete, try opening the Steam application again.
3. Reinstall the Steam App
If the two methods above don’t work, there could be some problematic or damaged Steam system files. The best solution is to reinstall the Steam application.


Who Invented Lithium ion Batteries
SHARE More Imagine a world without smartphones, laptops, or electric cars. Crazy, right? These amazing devices rely on a powerful...


Who Invented SSD : A Journey From Invention To Innovation
SHARE More The dominance of Solid State Drives (SSDs) in modern data storage is undeniable. Their lightning-fast performance, superior reliability,...


Google Gemini: Your Super-Smart AI Sidekick (Made Easy!)
SHARE More Imagine a helpful friend who can write emails, translate languages, dream up creative ideas, and even write code!...


Who Invented Gorilla Glass for Mobile: Unveiling the Inventor and Its Impact
SHARE More In the ever-evolving landscape of mobile technology, Gorilla Glass has emerged as a revolutionary material, providing durability and...


The Evolution of Touch Screen Technology: A Journey into its Inventors and Innovations
SHARE More Touch screen technology has become an integral part of our daily lives, seamlessly blending with our smartphones, tablets,...

The Evolution of Memory Cards: Unraveling the Inventors Behind the Innovation
SHARE More In the fast-paced world of technology, memory cards have become an indispensable part of our daily lives. From...


Who Invented Sim Card | The Origin and Inventor of the SIM Card: A Revolutionary Communication Breakthrough
SHARE More In today’s digitally interconnected world, the SIM card stands as a tiny yet indispensable component of our daily...

Who invented Walkie-Talkie | Exploring the Wonders of Walkie-Talkies: A Simple Guide for Beginners
SHARE More Walkie-talkies, often fondly referred to as “woki tokies,” are incredible communication devices that have stood the test of...


Who Invented Camera Lens : A Revolutionary Innovation in Photography
SHARE More The invention of the camera lens stands as a pivotal milestone in the history of photography, fundamentally altering...


The Evolution of Radio Broadcasting: Who Invented Radio?
SHARE More Radio broadcasting has been a cornerstone of communication, entertainment, and information dissemination for over a century. It revolutionized...
-

 Phones5 years ago
Apple iPhone 11 (2019) – Release, Info, Leaks, Rumors
-
![Huawei's New Operating System is HarmonyOS [ Officially ],harmony os,huawei new operating system, huawei harmony OS,](https://www.thedigitnews.com/wp-content/uploads/2019/08/Screenshot__2285_-removebg-preview-2-1-400x240.png)
![Huawei's New Operating System is HarmonyOS [ Officially ],harmony os,huawei new operating system, huawei harmony OS,](https://www.thedigitnews.com/wp-content/uploads/2019/08/Screenshot__2285_-removebg-preview-2-1-80x80.png) Phones5 years ago
Phones5 years agoHuawei New Operating System is HarmonyOS [ Officially ]
-

 News5 years ago
Belle Delphine bath water – Instagram Model Sells Used Bathwater For 30$ To Their Loyal Followers
-

 Tech5 years ago
Levi’s Bluetooth Jacket Lets You Control Your Smartphone