
MS Word
How to Create Different Pages in Word

How to create different pages in Word certainly be an important part, both when writing long documents for use in a business or a school project Guys.
By creating different pages in Word, it will be easier for someone to know what part of the page when he is reading the paper.
In many ways, this page is a requirement for any task done in Word. That’s why it’s important for you to know this tutorial Guys.
HOW TO CREATE DIFFERENT PAGES IN WORD
Microsoft Word gives you several options if you want to create different pages in your document. So the method is the same as giving a number on your page, Guys. Check out the steps directly below:
- Open your document in Word 2013 which will be numbered
- Click the ‘ Insert ‘ tab at the top of the Window
- Then, click the ‘ Page Number ‘ icon in the ‘ Header & Footer ‘ section of the Window
- Select the part of the page where you want to enter the page number, then select the position where you want the number to be displayed
As mentioned earlier, in this example we selected the ‘ Top of the Page ‘ option and placed the number on the right.
Finished! Now, you will see that the page number has been displayed on every page of the Microsoft Word document.
Additionally, you can also edit the document page numbers so you don’t just number the first page or title.
Other Ways to Create Pages in Word
The previous method is used when there is no need to distinguish page numbers. If you want to distinguish the page numbers in the document, you can follow these steps, guys:
- Open the document you want to edit
- Then select the Insert menu
- Then click Page Number
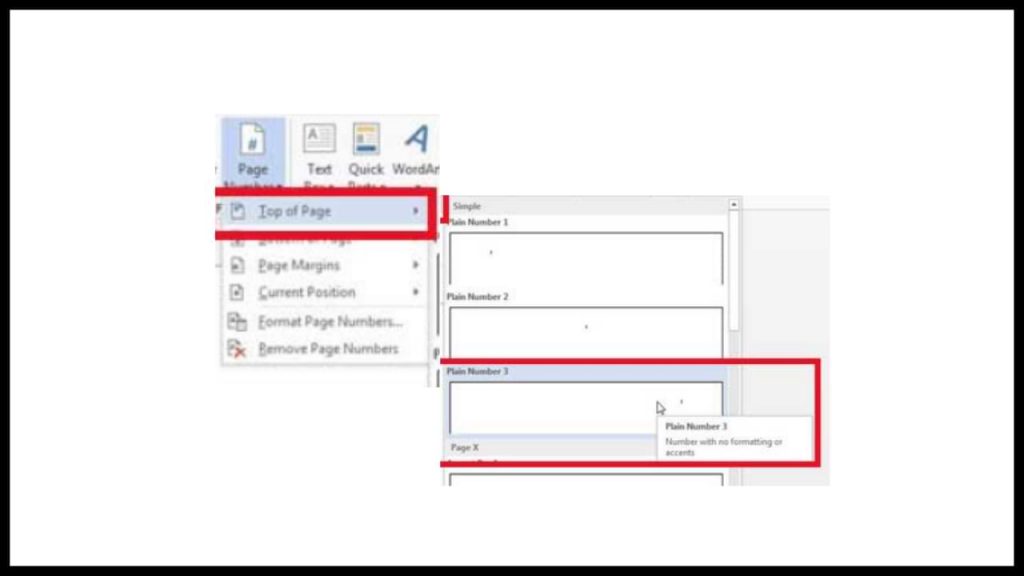
- Continue by clicking Bottom of Page
- Next, you can choose Plain Number 2 if you want to put the first page at the bottom center
- Flag options Different First Page
- If you want to edit the next page with the page number at the top right, then you can select Edit Page Header 2
- Then select Page Number
- Next, just select Top of Page3
Well, that’s the explanation of the steps that will make your task/work easier. After you know this method, it will certainly make it easier for you to do other tasks, guys. Don’t forget to stop by for other tutorial articles, okay?


How to make a letterhead in Word correctly and neatly is actually easy, but surely there are still many of you who don’t know how to make it.
In an official letter, of course, there is a letterhead and there is always a line at the bottom right. Well, it turned out to be quite easy to make you know.
Apart from being the introduction to a letter, letterhead is also commonly used as a place to write the identity of the letter, such as the identity of the sender and recipient.
For those of you who want to know how to make it, here we explain in full the steps to make a letterhead in Word for you.
HOW TO MAKE LETTERHEAD IN WORD
You should know how to make a letterhead in Word this time, guys, especially when you want to send letters between agencies.
Although not all agencies use it, it doesn’t hurt you to try and find out how to make this letterhead, here are the steps!
- First, open your Word.
- Place the cursor at the back of the last word of the letterhead
- Then select the menu Borders – Borders and Shading.
- After the border menu appears, all you have to do is select the line you want on the menu with a sign like this.
Don’t rush to click Ok, because there’s one more thing you have to do to make it, guys. In the section below, remove it or set it like this to make the line only exist at the bottom, and then Ok.
Yeah, you have successfully drawn the line, Guys, it’s easy and fast, right, how to make a letterhead in Word?
You don’t need to be confused anymore about how to make it. For beginners, making letterhead or letterhead does sound quite difficult.
In fact, how to make a letterhead in Word is fairly easy as long as you already know the procedure. After all, the letterhead cannot be made casually because it is an official identity.
The letterhead contains the official identity of an institution, agency, or company. Well, you can create an official identity on the letterhead in Microsoft Word.

This way of making a background in Word aims to beautify the appearance of the document and make it more attractive Guys.
Usually, this is often found in the use of proposals, certificates, covers, and not infrequently in job applications.
With this function, how do you make it? It’s so easy. Yes, although there are several ways you can do this, you can follow this tutorial in full.
HOW TO MAKE A BACKGROUND IN WORD
This background function is very useful if you want to create a document that upholds the originality of Guys, for example, a thesis.
In addition to having to know how to create a table of contents in Microsoft Word, you may also need to know how to create a background in your thesis document, especially in showing the results of the tests you did.
How to make this background is also needed if you want to make an official letter from the agency. Besides needing to know how to make letterhead lines in Word, you also need to know how to add a background to the letter. Here’s how:
- The first thing you can do is change the color.
- Go to Design – Page Color – and immediately choose a color like this.
That is the easiest way and you can change the color according to your needs or tastes, guys. In addition to this method, you can also replace it with an image that you have.
The method is almost the same, guys, pay attention to the following rare:
- Go to the Design menu.
- Click Page Color.
- Select Fill Effects.
- Next, select the tab Picture – Select Picture – From a File.
- Then find the image you have and press Ok
- Finished! The background will change.
But, you also need to remember that both methods will not appear when you print either color or image.
To make it appear when printing, then you need to go to the File menu – Options – Display – and check the Print background colors and Image.
Well, after you go through these few steps, the background will change and also enter when you print, GRATZ!!! It’s easy to make a background in Word.

There are several ways to make a signature in Microsoft Word. And the method is really easy, just follow the steps below, guys!
Making a signature is really needed, especially in the digital era like now, right? Of course, you need a signature in your Word file, so from that our Team will provide this tutorial in detail.
Actually, you can also use a third application or additional devices such as pens that support your PC or laptop. But this is the easiest way without using other devices and applications Guys.
HOW TO CREATE A SIGNATURE IN WORD
You need to sign first, Guys on a piece of white paper. Make sure the paper is really white and the pen has colour ink that you can really see clearly.
This function is for later photos or files the resolution will be smaller Guys. Not only that, but the customized color saturation will also reduce the thickness of the pen color, you know.
So make sure you give a signature with a clear enough emphasis. Here’s how to create a signature in Word:
- Prepare a white paper with a signature on it. Photos using a smartphone or you can directly scan the signature through a scanner.

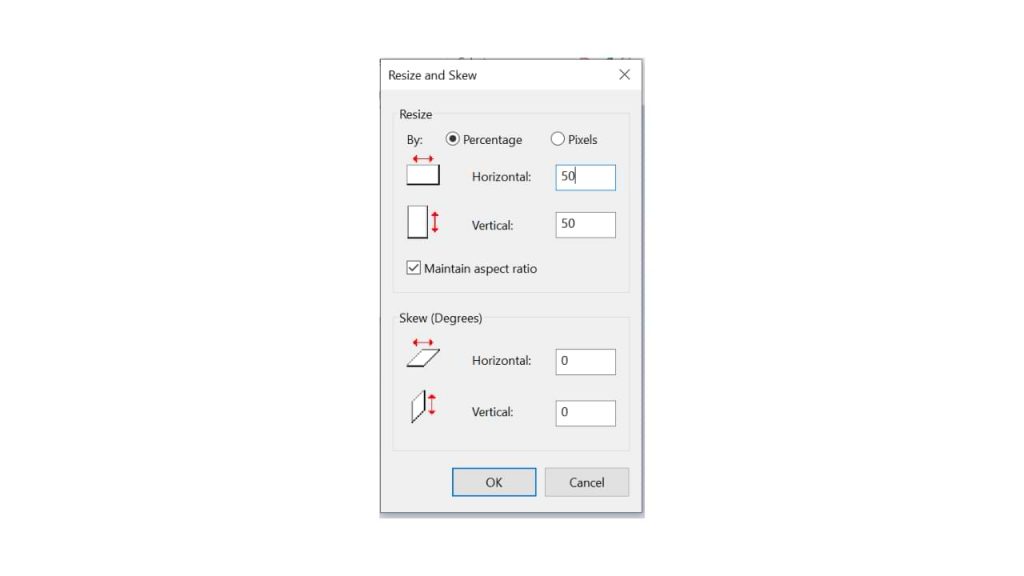
- You can reduce the resolution and crop it so that the photo focuses on the signature. For convenience, click the image file > Edit.
- On the Paint menu, you can resize to reduce the resolution. Choose 50 per cent resolution, fill Horizontal 50 and Vertical 50
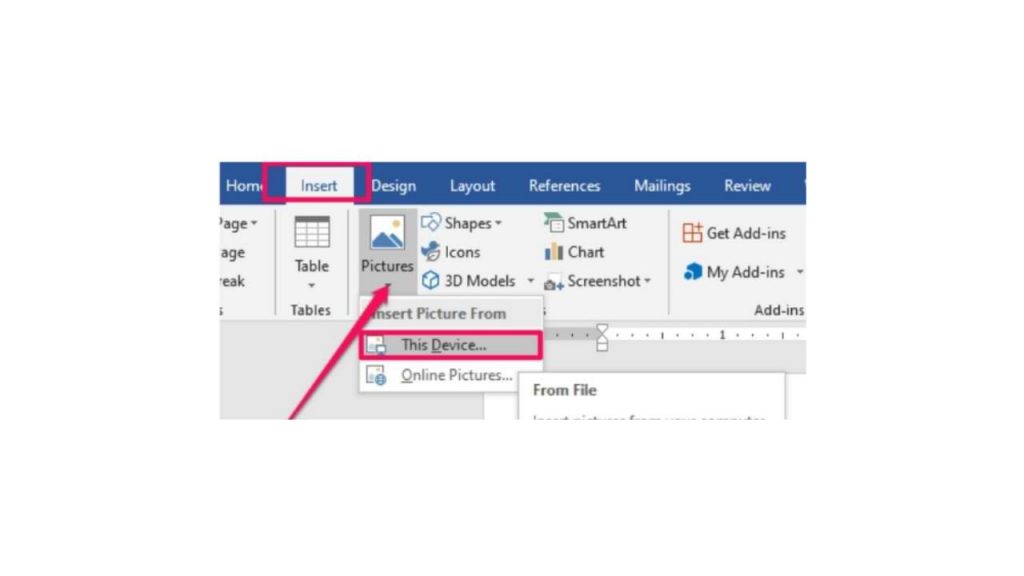
- Hover over the exact position of the word you want to add a signature to. Click Insert > Picture > insert the previous signature image file.
- After you insert the image, reduce the size again using the cursor for more precision.
- Double click on the image.
- On the Format menu, select the Color > Recolor > Black and White 50 per cent submenu.
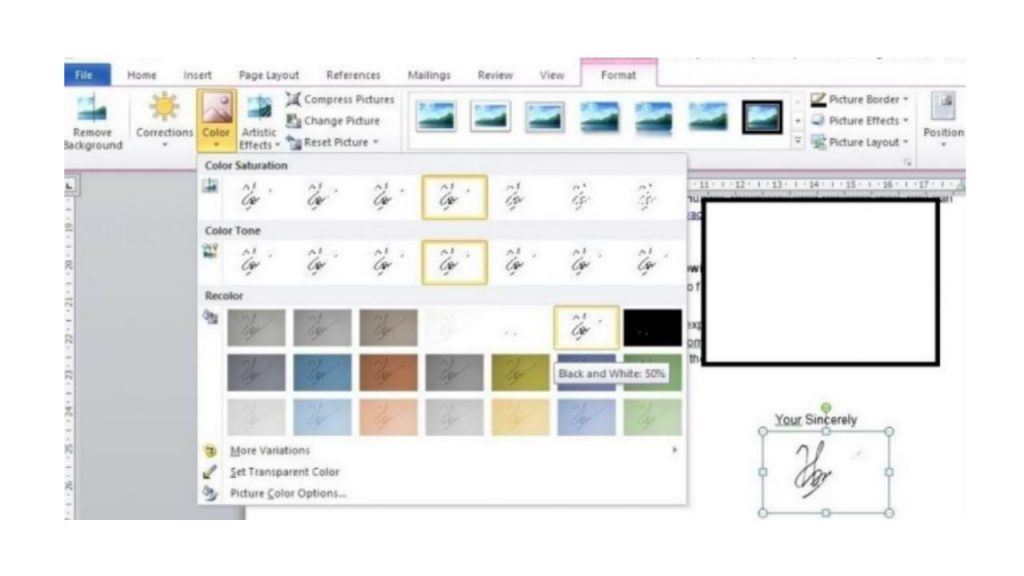
- if your signature is not clear, double click on the image, select menu Correction > Brightness 0 per cent (Normal) Contrast 40 per cent.
You can change the last two steps depending on the contrast and color saturation you want, guys. So you can at the same time adjust the thickness of your signature that has entered the word, so guys.
I also said what Guys, how easy it is to make a signature in Microsoft Word! The most important thing is to make sure your signature is clear enough, and the photos are of high enough quality. Obviously, so that later your signature looks good, it doesn’t break.


Who Invented Lithium ion Batteries
SHARE More Imagine a world without smartphones, laptops, or electric cars. Crazy, right? These amazing devices rely on a powerful...


Who Invented SSD : A Journey From Invention To Innovation
SHARE More The dominance of Solid State Drives (SSDs) in modern data storage is undeniable. Their lightning-fast performance, superior reliability,...


Google Gemini: Your Super-Smart AI Sidekick (Made Easy!)
SHARE More Imagine a helpful friend who can write emails, translate languages, dream up creative ideas, and even write code!...


Who Invented Gorilla Glass for Mobile: Unveiling the Inventor and Its Impact
SHARE More In the ever-evolving landscape of mobile technology, Gorilla Glass has emerged as a revolutionary material, providing durability and...


The Evolution of Touch Screen Technology: A Journey into its Inventors and Innovations
SHARE More Touch screen technology has become an integral part of our daily lives, seamlessly blending with our smartphones, tablets,...


The Evolution of Memory Cards: Unraveling the Inventors Behind the Innovation
SHARE More In the fast-paced world of technology, memory cards have become an indispensable part of our daily lives. From...
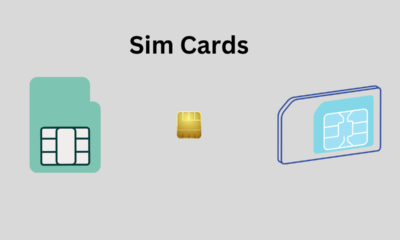

Who Invented Sim Card | The Origin and Inventor of the SIM Card: A Revolutionary Communication Breakthrough
SHARE More In today’s digitally interconnected world, the SIM card stands as a tiny yet indispensable component of our daily...


Who invented Walkie-Talkie | Exploring the Wonders of Walkie-Talkies: A Simple Guide for Beginners
SHARE More Walkie-talkies, often fondly referred to as “woki tokies,” are incredible communication devices that have stood the test of...


Who Invented Camera Lens : A Revolutionary Innovation in Photography
SHARE More The invention of the camera lens stands as a pivotal milestone in the history of photography, fundamentally altering...
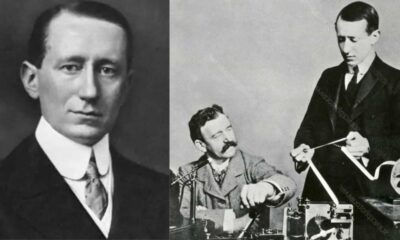

The Evolution of Radio Broadcasting: Who Invented Radio?
SHARE More Radio broadcasting has been a cornerstone of communication, entertainment, and information dissemination for over a century. It revolutionized...
-

 Phones5 years ago
Apple iPhone 11 (2019) – Release, Info, Leaks, Rumors
-
![Huawei's New Operating System is HarmonyOS [ Officially ],harmony os,huawei new operating system, huawei harmony OS,](https://www.thedigitnews.com/wp-content/uploads/2019/08/Screenshot__2285_-removebg-preview-2-1-400x240.png)
![Huawei's New Operating System is HarmonyOS [ Officially ],harmony os,huawei new operating system, huawei harmony OS,](https://www.thedigitnews.com/wp-content/uploads/2019/08/Screenshot__2285_-removebg-preview-2-1-80x80.png) Phones5 years ago
Phones5 years agoHuawei New Operating System is HarmonyOS [ Officially ]
-

 News5 years ago
Belle Delphine bath water – Instagram Model Sells Used Bathwater For 30$ To Their Loyal Followers
-

 Tech5 years ago
Levi’s Bluetooth Jacket Lets You Control Your Smartphone