Mac
How to find Mac
Just as you can lose your iPhone or iPad, you may either forget your computer or it may be stolen. This is why it is necessary that you have the Find My poppy option configured, because that way, in case it happens, you will be able to find it in a few simple steps. In this post, we will tell you how to configure it.
In case of loss or theft, you can find your computer in a few minutes, you must have the Find My Mac option enabled. As with other Apple devices such as the iPhone or iPad, this option allows you to find your device through any other. It works just like any other Apple device, and it can be very useful if you are someone who goes everywhere with your computer or if you are a little absent and can lose or forget it anywhere.
What is Find My Mac for?
As we have said before, this option is used so that you can find your computer if it is stolen or lost. It is true that it is difficult to lose a laptop, but you can forget it somewhere, inside a backpack or bag. Therefore, it is important to always have this option enabled. It makes no major changes to how your Mac works, so you have no excuse for not activating it.
You probably already know how this system works on an iPhone since at some point we all had to look for a mobile, either ours or a friend or acquaintance. On Mac it works pretty much the same, you just need to activate it and with your iCloud account, you will be able to find it.
Procedure to configure it
- On the Mac, choose Apple menu > System Preferences, then click iCloud. If you are prompted to sign in, enter your Apple ID or, if you do not have one, click Create New Apple ID and follow the instructions.
- Select Find My Mac. If you are prompted to confirm that Find My Mac is using the location of your Mac, click Allow.
- If a Details button appears next to Find My Mac, click the button, select “Open Security & Privacy,” and then select “Turn on-location services.”
- The Details button appears if location services are turned off in the security and privacy settings.
- If “Turn on location services” is dimmed in “Security and privacy”, click on the lock icon and enter the name and password of a computer administrator.
- For added security, make sure all user accounts have strong passwords and automatic login is turned off in the settings for users and groups.
- For instructions, see Changing the Mac Login Password. To open the Users and Groups settings, choose Apple menu> System Preferences, and then click Users And Groups.
So you can find it
When you need to locate and protect your missing Mac, do one of the following:
- Use another computer: Go to icloud.com/find to use the Find My iPhone app on iCloud.com. Use a Mac or Windows browser that meets iCloud system requirements.
- Use an iOS device – Use the Find My iPhone app.
- For more information, tap Help in the Find My iPhone app.
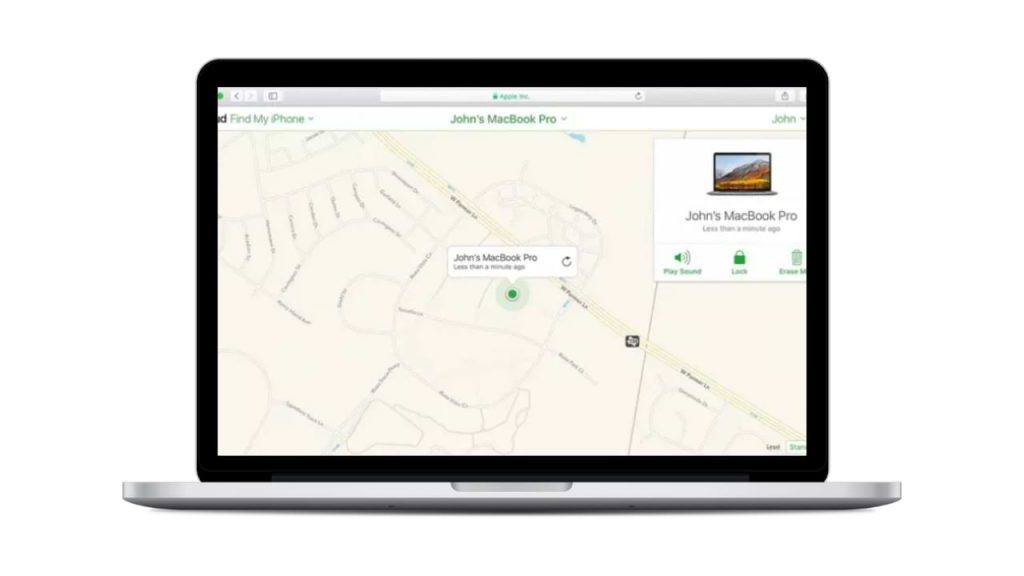
With the Find My iPhone app on iCloud.com or on an iOS device, you can:
- Find your Mac on a map: See the approximate location of your Mac when connected to a Wi-Fi network.
- Play a sound with your Mac: If you think you’ve lost your Mac somewhere nearby, you can have it play a sound to help you find it. This option is most commonly used on smaller Apple devices, such as the Apple Watch.
- Lock your Mac: If you can’t find your Mac, you can lock it with a password so no one else can use it. This may be the first step to follow if you suspect it may have been stolen or if you do not want anyone to know the information you have stored.
- Wipe poppy – Remotely wipe everything on your Mac and lock it with a password so no one else can use it.
- Before deleting your Mac, try to find it on a map and make it play a sound. After removing it, you will not be able to use Find My iPhone for these processes. However, you can see the location where you were last connected to a Wi-Fi network.
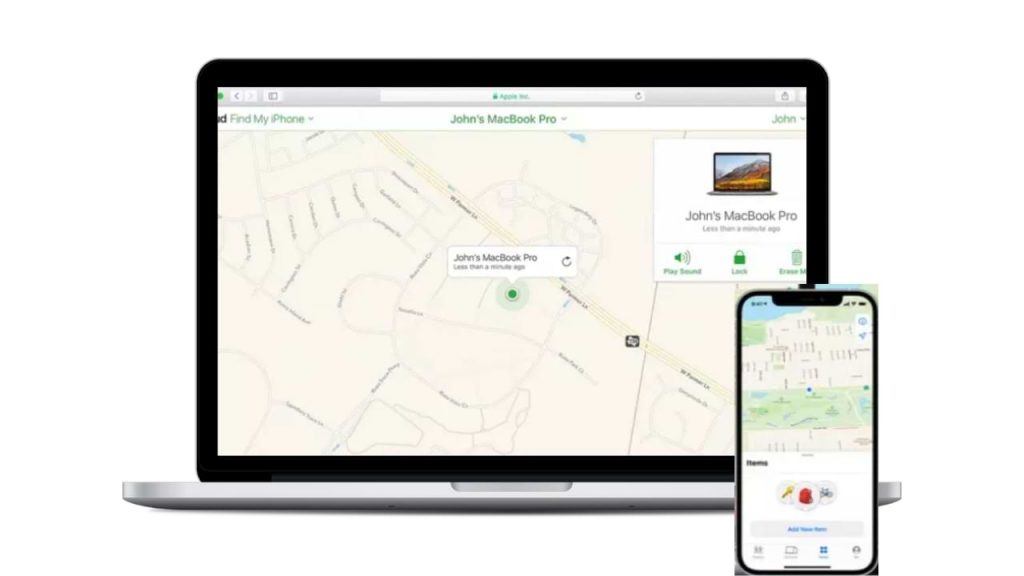
Note that if your Mac is turned off or disconnected when you try to do any of the above, the actions will occur the next time your computer connects to the Internet. For this reason, you need to make sure it has an internet connection because if you try to look for it and it does not have it, it will not help and you will have to look at the app all day long.
If you cannot find your Mac or have not configured Find My
Find My Mac is the only Apple service that can help you track down or locate a missing Mac. If you have not set up Find My Mac before losing it, or if you cannot find it, these steps can help you protect your data:
- Change your Apple ID password to prevent anyone from accessing your iCloud data or using other services (like iMessage or iTunes) from your Mac.
- Change the password for other accounts you use with your Mac, such as email, banking and social networking accounts like Facebook or Twitter.
- Report your Mac lost or stolen to the police. You may be asked to enter your computer’s serial number. You can find this information on the original box or receipt you received when you purchased your Mac.
- Another option you can do is to search websites for buying and selling used products. This would not be the first time a user has recovered their stolen device thanks to this type of portal.
Mac
How to Access System Report on MacOS Ventura
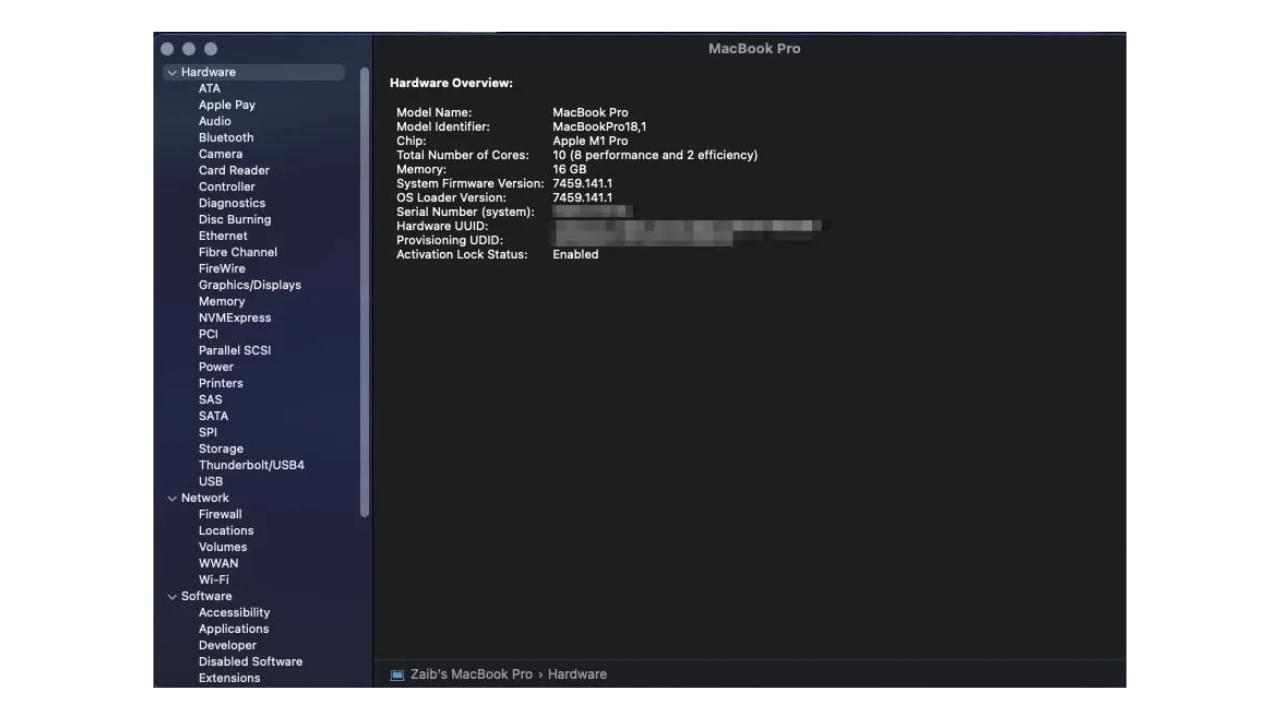
Accessing the System Report on a MacOS Ventura can provide you with useful information about your device, including its hardware and software specifications, performance, and usage statistics. This information can be especially useful if you are troubleshooting an issue, trying to upgrade your device, or just want to know more about your computer.
Here’s a step-by-step guide on how to access the System Report on a MacOS Ventura:
Step 1: Open the Apple Menu
The first step to accessing the System Report is to open the Apple menu located in the top-left corner of your screen. Click on the Apple logo to open the menu.
Step 2: Choose “About This Mac”
Once the Apple menu is open, select “About This Mac” from the options. This will open a window that displays basic information about your MacOS Ventura, such as the operating system version, processor type, and memory.
Step 3: Click on “System Report”
At the bottom of the “About This Mac” window, there is a button labeled “System Report”. Click on this button to open the System Report.
Step 4: Browse the System Report
The System Report contains a wealth of information about your MacOS Ventura. You can browse through the report by clicking on the various categories listed on the left side of the window. Some of the categories you may want to check out include:
- Hardware: This section provides detailed information about the hardware components of your device, including the processor, memory, storage, and other peripherals.
- Software: This section provides information about the software installed on your MacOS Ventura, including the operating system version, installed applications, and other software.
- Network: This section provides information about your device’s network connections, including Wi-Fi, Ethernet, and other network devices.
- Power: This section provides information about your device’s power usage and battery performance.
Step 5: Save the System Report
If you need to save the System Report for later reference, you can do so by clicking on “File” in the menu bar and selecting “Save”. This will allow you to save a copy of the report as a text file on your computer.
In conclusion, accessing the System Report on a MacOS Ventura can provide you with valuable information about your device, and can be a helpful tool for troubleshooting, upgrading, or just getting to know your computer better. By following these steps, you can easily access and save the System Report on your MacOS Ventura.
Mac
How to Copy & Paste Edits to Photos on Mac
Copying and pasting edits to photos on a Mac can be a time-saving technique for those who often need to apply similar adjustments to multiple photos. Here is a step-by-step guide to copy and paste edits from one photo to another on a Mac:
- Open Photos app: The Photos app is the default photo management software for Mac computers. Open it by clicking the Photos icon in the Launchpad or by searching for it using Spotlight.
- Select the Source Photo: Choose the photo that you have already made edits to and want to copy the adjustments from.
- Click “Edit” button: Once the source photo is selected, click the “Edit” button located in the top right corner of the Photos window.
- Copy Edits: To copy the edits, click the “File” menu and then select “Duplicate” or press “Cmd+D”. A duplicate copy of the photo will appear in the Photos library.
- Select the Destination Photo: Next, select the photo to which you want to paste the edits.
- Click “Edit” button: As in step 3, click the “Edit” button to open the editing tools for the destination photo.
- Paste Edits: Now, click the “File” menu and select “Paste Adjustments” or press “Cmd+Option+V”. The adjustments from the source photo will now be applied to the destination photo.
- Save Changes: After pasting the edits, make sure to save the changes to the destination photo by clicking the “Done” button in the top right corner of the Photos window.
Note: The “Paste Adjustments” feature is only available on Photos app version 3.0 or later. If you have an older version, you may need to update the Photos app to take advantage of this feature.
By following these simple steps, you can easily copy and paste edits from one photo to another on your Mac. This can save time and effort, especially when making similar adjustments to multiple photos.
Mac
How to Change the Undo Send Delay on Mac Mail

Mac Mail is a powerful email client that comes built-in with the latest version of macOS. It offers a wide range of features that make email management a breeze. One of its most useful features is the “Undo Send” option, which allows you to recall a sent email within a few seconds of sending it.
By default, the undo send delay on Mac Mail is set to 10 seconds, but this setting can be changed based on your preference. In this article, we will be discussing the steps involved in changing the undo send delay on Mac Mail.
Step 1: Launch Mac Mail
To begin, launch the Mac Mail application on your Mac.
Step 2: Go to Preferences
Next, click on the Mail menu in the top left corner of the screen and select “Preferences“. This will open the Mail preferences window.
Step 3: Select “Composing”
In the preferences window, click on the “Composing” tab. This tab contains all the settings related to composing and sending emails in Mac Mail.
Step 4: Change Undo Send Delay
Under the “Undo Send Delay” section, you will see the current delay setting. You can change this setting by using the drop-down menu to select a different value. The values range from 10 seconds to 120 seconds.
Step 5: Save Changes
Once you have selected the desired delay setting, close the preferences window by clicking on the “OK” button. Your changes will be saved automatically.
Step 6: Test the New Delay
To test the new undo send delay, send an email and try to recall it within the new delay time. You should be able to recall the email by clicking on the “Undo Send” option in the top right corner of the screen.
In conclusion, changing the undo send delay on Mac Mail is a simple process that can be done within a few minutes. By increasing the delay, you can give yourself more time to recall a sent email in case you made a mistake. This can save you from potential embarrassment and improve your email management experience.
-

 Phones5 years ago
Apple iPhone 11 (2019) – Release, Info, Leaks, Rumors
-
![Huawei's New Operating System is HarmonyOS [ Officially ],harmony os,huawei new operating system, huawei harmony OS,](https://www.thedigitnews.com/wp-content/uploads/2019/08/Screenshot__2285_-removebg-preview-2-1-400x240.png)
![Huawei's New Operating System is HarmonyOS [ Officially ],harmony os,huawei new operating system, huawei harmony OS,](https://www.thedigitnews.com/wp-content/uploads/2019/08/Screenshot__2285_-removebg-preview-2-1-80x80.png) Phones5 years ago
Phones5 years agoHuawei New Operating System is HarmonyOS [ Officially ]
-

 News5 years ago
Belle Delphine bath water – Instagram Model Sells Used Bathwater For 30$ To Their Loyal Followers
-

 Tech5 years ago
Levi’s Bluetooth Jacket Lets You Control Your Smartphone


