
Mac
How to Remove Recent and Suggested Apps from the Dock on Mac

Apple operating systems have announced a way to improve the interface appreciated through its screen since through the Mac dock you can get an interactive toolbar that can display the content of interest.
This interaction has been programmed to show a sequence of the applications most used by the user, or in that case, those that have been recently opened.
In this way, it is intended that all people have easy and quick access to these programs and that in the same way it can be customized to obtain the greatest benefit from this dynamic bar.
Many people have managed to obtain the most updated versions of the operating systems and equipment that have them, so today you can learn how to reconfigure this section.
Disable suggested and recent apps from your Mac’s dynamic bar
As mentioned above, one of the novelties that come with the latest versions of Apple’s operating system is the interactive bar feature called “Dock” which allows adding useful and interesting content.
Fortunately, it is not an aspect that must be installed by the user, as it is configured by default so that it forms part of the desktop interface automatically.

Its use is, mainly, to show a series of recommended programs for the user’s utility, and in the same way, those applications that are used frequently, including those that start automatically when the Mac is turned on .
Although this idea fascinated all operating system developers, there are certain people in the community who dislike change and prefer to return to the common aesthetics of their computer.
Fortunately for these people, and for you if you are part of them, there is the possibility of eliminating it from the interface or even managing to customize it to your liking in a very simple way.
How do you disable this new feature on your Mac?
In case this novelty is very annoying on your computer, the Mac system has made it possible to deactivate this function so that you do not have to occupy more space or consume a dynamism that you do not want.
To achieve this, you will only have to access “System Preferences “, an option that can be accessed by clicking on the apple icon that is on the toolbar.
Later, when you find the name of “Dock”, you can click on it and deactivate the option that mentions the constant appearance of applications within your taskbar.
If, on the other hand, you want to do the opposite, and that for some reason this option is deactivated, you can repeat the steps and check the box, so that you can insert suggested, recent applications and even those you want to use, such as Onyx, in case you need to locate hidden functions on your computer.
The dock is also an element that improves the interface of the iPhone
As in the Mac, from version number 11, the iPhone also has this renewed interface that Apple has imposed for its users. But in the same way that it is configurable on the computer, it is also configurable on your mobile device.
Therefore, if through this bar you receive many notifications about suggested apps or you want to stop viewing frequently used programs, such as with iMessage or the game center, you should know that you can do so.
Access the configuration of your iPhone and within “General” you will find the option of ” Multitasking and the Dock ” which is nothing more than the interactive bar that you want to customize.
You will automatically see a list of functions from which you can select, but the one you are interested in is last, such as a marked box that indicates ” Show recent and suggested apps .”
When you disable it, this toolbar will once again be what you used to know within your device, a space to gather the applications of your choice, so it will be enough to reconfigure it to your liking to continue enjoying the virtues and novelties of this OS.

Accessing the System Report on a MacOS Ventura can provide you with useful information about your device, including its hardware and software specifications, performance, and usage statistics. This information can be especially useful if you are troubleshooting an issue, trying to upgrade your device, or just want to know more about your computer.
Here’s a step-by-step guide on how to access the System Report on a MacOS Ventura:
Step 1: Open the Apple Menu
The first step to accessing the System Report is to open the Apple menu located in the top-left corner of your screen. Click on the Apple logo to open the menu.
Step 2: Choose “About This Mac”
Once the Apple menu is open, select “About This Mac” from the options. This will open a window that displays basic information about your MacOS Ventura, such as the operating system version, processor type, and memory.
Step 3: Click on “System Report”
At the bottom of the “About This Mac” window, there is a button labeled “System Report”. Click on this button to open the System Report.
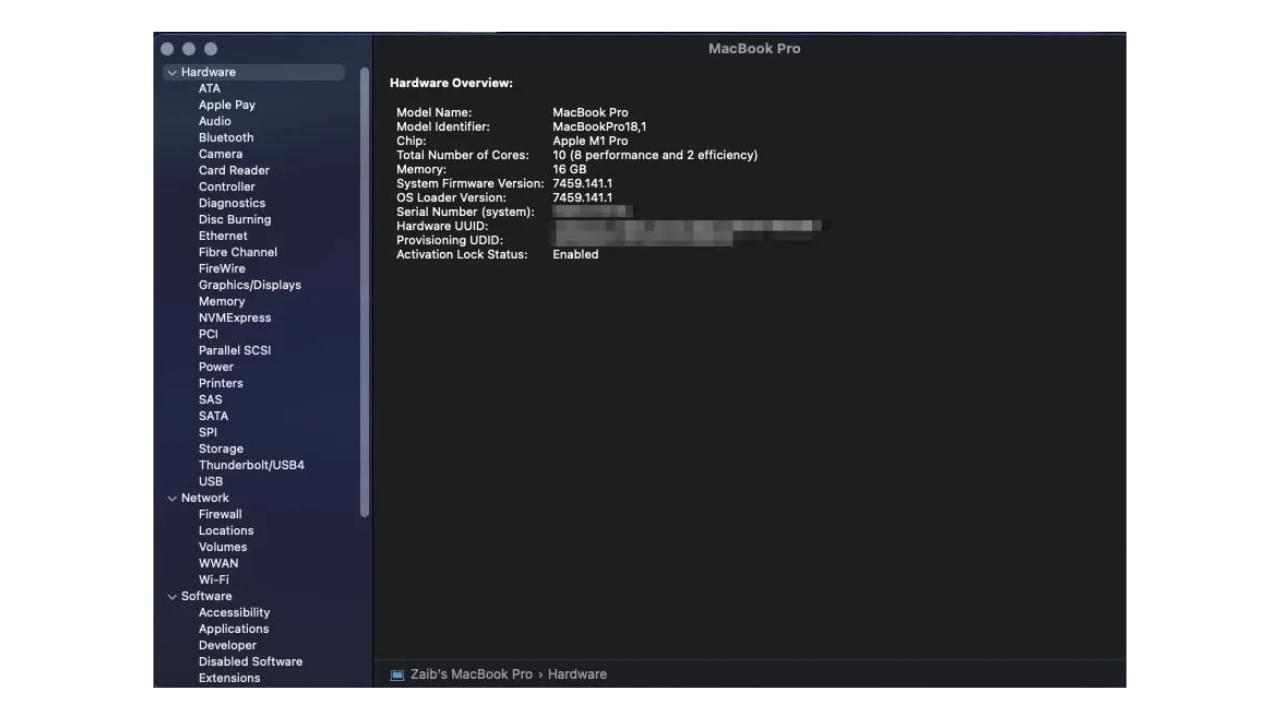
Step 4: Browse the System Report
The System Report contains a wealth of information about your MacOS Ventura. You can browse through the report by clicking on the various categories listed on the left side of the window. Some of the categories you may want to check out include:
- Hardware: This section provides detailed information about the hardware components of your device, including the processor, memory, storage, and other peripherals.
- Software: This section provides information about the software installed on your MacOS Ventura, including the operating system version, installed applications, and other software.
- Network: This section provides information about your device’s network connections, including Wi-Fi, Ethernet, and other network devices.
- Power: This section provides information about your device’s power usage and battery performance.
Step 5: Save the System Report
If you need to save the System Report for later reference, you can do so by clicking on “File” in the menu bar and selecting “Save”. This will allow you to save a copy of the report as a text file on your computer.
In conclusion, accessing the System Report on a MacOS Ventura can provide you with valuable information about your device, and can be a helpful tool for troubleshooting, upgrading, or just getting to know your computer better. By following these steps, you can easily access and save the System Report on your MacOS Ventura.
Copying and pasting edits to photos on a Mac can be a time-saving technique for those who often need to apply similar adjustments to multiple photos. Here is a step-by-step guide to copy and paste edits from one photo to another on a Mac:
- Open Photos app: The Photos app is the default photo management software for Mac computers. Open it by clicking the Photos icon in the Launchpad or by searching for it using Spotlight.
- Select the Source Photo: Choose the photo that you have already made edits to and want to copy the adjustments from.
- Click “Edit” button: Once the source photo is selected, click the “Edit” button located in the top right corner of the Photos window.
- Copy Edits: To copy the edits, click the “File” menu and then select “Duplicate” or press “Cmd+D”. A duplicate copy of the photo will appear in the Photos library.
- Select the Destination Photo: Next, select the photo to which you want to paste the edits.
- Click “Edit” button: As in step 3, click the “Edit” button to open the editing tools for the destination photo.
- Paste Edits: Now, click the “File” menu and select “Paste Adjustments” or press “Cmd+Option+V”. The adjustments from the source photo will now be applied to the destination photo.
- Save Changes: After pasting the edits, make sure to save the changes to the destination photo by clicking the “Done” button in the top right corner of the Photos window.
Note: The “Paste Adjustments” feature is only available on Photos app version 3.0 or later. If you have an older version, you may need to update the Photos app to take advantage of this feature.
By following these simple steps, you can easily copy and paste edits from one photo to another on your Mac. This can save time and effort, especially when making similar adjustments to multiple photos.

Mac Mail is a powerful email client that comes built-in with the latest version of macOS. It offers a wide range of features that make email management a breeze. One of its most useful features is the “Undo Send” option, which allows you to recall a sent email within a few seconds of sending it.
By default, the undo send delay on Mac Mail is set to 10 seconds, but this setting can be changed based on your preference. In this article, we will be discussing the steps involved in changing the undo send delay on Mac Mail.
Step 1: Launch Mac Mail
To begin, launch the Mac Mail application on your Mac.
Step 2: Go to Preferences
Next, click on the Mail menu in the top left corner of the screen and select “Preferences“. This will open the Mail preferences window.
Step 3: Select “Composing”
In the preferences window, click on the “Composing” tab. This tab contains all the settings related to composing and sending emails in Mac Mail.
Step 4: Change Undo Send Delay
Under the “Undo Send Delay” section, you will see the current delay setting. You can change this setting by using the drop-down menu to select a different value. The values range from 10 seconds to 120 seconds.
Step 5: Save Changes
Once you have selected the desired delay setting, close the preferences window by clicking on the “OK” button. Your changes will be saved automatically.
Step 6: Test the New Delay
To test the new undo send delay, send an email and try to recall it within the new delay time. You should be able to recall the email by clicking on the “Undo Send” option in the top right corner of the screen.
In conclusion, changing the undo send delay on Mac Mail is a simple process that can be done within a few minutes. By increasing the delay, you can give yourself more time to recall a sent email in case you made a mistake. This can save you from potential embarrassment and improve your email management experience.


Who Invented Lithium ion Batteries
SHARE More Imagine a world without smartphones, laptops, or electric cars. Crazy, right? These amazing devices rely on a powerful...


Who Invented SSD : A Journey From Invention To Innovation
SHARE More The dominance of Solid State Drives (SSDs) in modern data storage is undeniable. Their lightning-fast performance, superior reliability,...


Google Gemini: Your Super-Smart AI Sidekick (Made Easy!)
SHARE More Imagine a helpful friend who can write emails, translate languages, dream up creative ideas, and even write code!...


Who Invented Gorilla Glass for Mobile: Unveiling the Inventor and Its Impact
SHARE More In the ever-evolving landscape of mobile technology, Gorilla Glass has emerged as a revolutionary material, providing durability and...


The Evolution of Touch Screen Technology: A Journey into its Inventors and Innovations
SHARE More Touch screen technology has become an integral part of our daily lives, seamlessly blending with our smartphones, tablets,...


The Evolution of Memory Cards: Unraveling the Inventors Behind the Innovation
SHARE More In the fast-paced world of technology, memory cards have become an indispensable part of our daily lives. From...

Who Invented Sim Card | The Origin and Inventor of the SIM Card: A Revolutionary Communication Breakthrough
SHARE More In today’s digitally interconnected world, the SIM card stands as a tiny yet indispensable component of our daily...


Who invented Walkie-Talkie | Exploring the Wonders of Walkie-Talkies: A Simple Guide for Beginners
SHARE More Walkie-talkies, often fondly referred to as “woki tokies,” are incredible communication devices that have stood the test of...


Who Invented Camera Lens : A Revolutionary Innovation in Photography
SHARE More The invention of the camera lens stands as a pivotal milestone in the history of photography, fundamentally altering...


The Evolution of Radio Broadcasting: Who Invented Radio?
SHARE More Radio broadcasting has been a cornerstone of communication, entertainment, and information dissemination for over a century. It revolutionized...
-
 Phones5 years ago
Apple iPhone 11 (2019) – Release, Info, Leaks, Rumors
-
![Huawei's New Operating System is HarmonyOS [ Officially ],harmony os,huawei new operating system, huawei harmony OS,](https://www.thedigitnews.com/wp-content/uploads/2019/08/Screenshot__2285_-removebg-preview-2-1-400x240.png)
![Huawei's New Operating System is HarmonyOS [ Officially ],harmony os,huawei new operating system, huawei harmony OS,](https://www.thedigitnews.com/wp-content/uploads/2019/08/Screenshot__2285_-removebg-preview-2-1-80x80.png) Phones5 years ago
Phones5 years agoHuawei New Operating System is HarmonyOS [ Officially ]
-

 News5 years ago
Belle Delphine bath water – Instagram Model Sells Used Bathwater For 30$ To Their Loyal Followers
-

 Tech5 years ago
Levi’s Bluetooth Jacket Lets You Control Your Smartphone