MS Excel
How to use Excel function FALSE and EXP correctly – Very easy

Nowadays it is very common to use different functions in different programs to facilitate the calculations that at a certain moment could take place at work, or in any other activity that is developed. Such is the case of Office Excel or iWork, which offers you various features to perform complex and repetitive calculations.
In this post, we will be talking about how to use the Excel function correctly FALSE and EXP in a simple way, in addition, we will talk about the applications that you can give to them, so you can carry out work with these functions.
What are FALSE and EXP functions for Excel?
Before starting with the syntax and examples of the use of these formulas, you must have previous knowledge of the use of Excel. In this sense, you will see that the FALSE and EXP functions will help you solve various aspects related to logical and mathematical problems. The first one, that is, the FALSE formula will return a logical expression that represents the same word.

This function does not require arguments, and it will be useful to logically fix situations that do not represent reality. For example, you put False to the expression “Frogs have 8 legs”, you know that it is not possible for frogs to have 8 legs, hence it makes sense to put the word false to said expression.
On the other hand, you will have the EXP function that will be very useful to solve expressions based on the constant number 2.71828182845904, which is the base of the natural logarithm.
Well yes, you will see that it is related to the mathematical expressions that are handled in studies at various levels. You can even make use of them to determine the behavior of process control curves in the industry, analyze the value of money over time, and other elements of various natures.
As an alternative to using the EXP formula in Excel, you will have the EXP.NDIST function, which will provide you with more complete tools to perform statistical analysis on a set of data. In general, these formulas will be very helpful for you in handling Excel.
Using the FALSE and EXP functions in Excel
As previously pointed out, the FALSE function does not require any type of data to function properly, however, you must place it correctly so that it does not throw an Error, because although it does not need an argument, Excel requires that you place the word FALSE (). As you can see, the inside of the parentheses is left empty, where the cell or the data value is usually placed in the formula.
On the other hand, you will have the possibility of complementing your logical expressions with the use of the TRUE function, since, as its name indicates, this expression determines or represents the reality of an expression. In this sense, you will have a complete tool that will allow you to logically determine the state of a real situation.
In the case of the EXP function, you will need to put data inside the parentheses, because unlike the FALSE formula, this function analyzes the data to deliver a number by multiplying the base (2.71828182845904) by itself the number of times indicated in the argument:
- EXP function requires argument and is written EXP (Number)
- Keep in mind that an expected expression is a number because if you type any expression other than a number, you will get an error as a result.
There are many examples of the use of the EXP formula, however, in this post, we address the most common way to perform the calculation, without neglecting the view that you can use it to determine values in curves or behavior graphs of certain natural phenomena, industrial and of various kinds. So you can place for example:
- EXP (1) and you will have as a result the real number 2.71828182845904
- EXP (2) and the result you will get will be 7.38905609
- So you can obtain different values according to your needs, below we show you a graph with an example
Finally, if you require more information about Excel functions, you can visit Microsoft’s support page to obtain the information you need and thus complement your knowledge in the use of Excel functions.
MS Excel
How To Use Rank Function in Microsoft Excel for Beginners

Surely you all know the Microsoft Excel application. Microsoft Excel is an application or software that is useful for processing numbers. As you already know, this application has a lot of uses and benefits.
The usefulness of this application is that it can create, analyze, edit, Rank, and sort several data because this application can calculate with arithmetic and statistics.
This tutorial will explain how to sort or rank data using Microsoft Excel.
How to Rank in Microsoft Excel
You can rank data in Microsoft Excel. By using the application, you can easily do work in processing data. Ranking data is also very useful for those who work as teachers.
Because this application can rank data in a very easy way and can be done by everyone. Here are ways to rank data in Microsoft Excel:
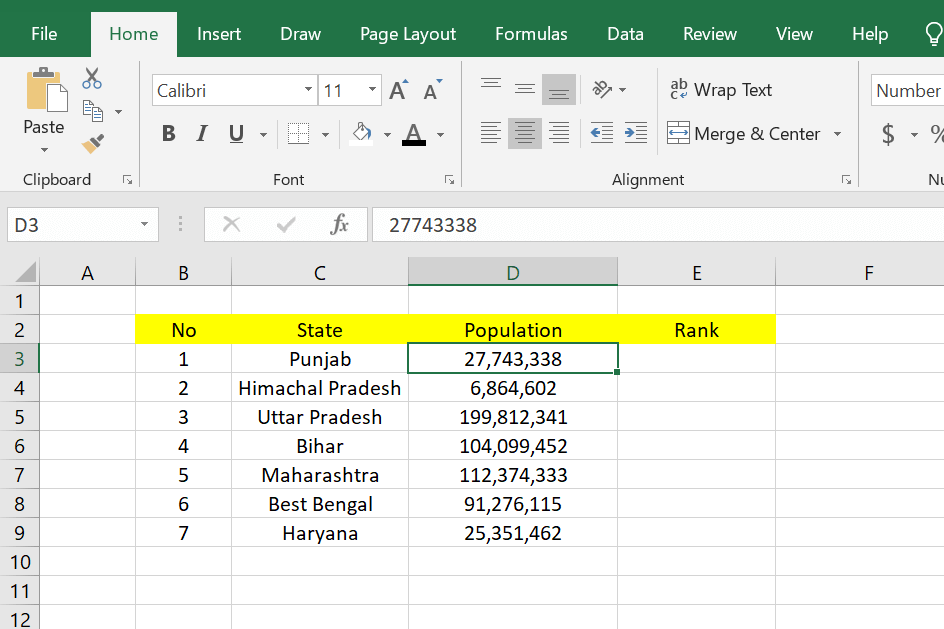
1. The first step you can take is to open a Microsoft Excel worksheet that already has the data you want to rank. In the example below, I want to rank students in a class by sorting them from rank 1 to 7 You can also rank according to the data you have.
2. After that, you can place your cursor in the cell, where you will rank the cells in the first order. You can see an example in the image below.
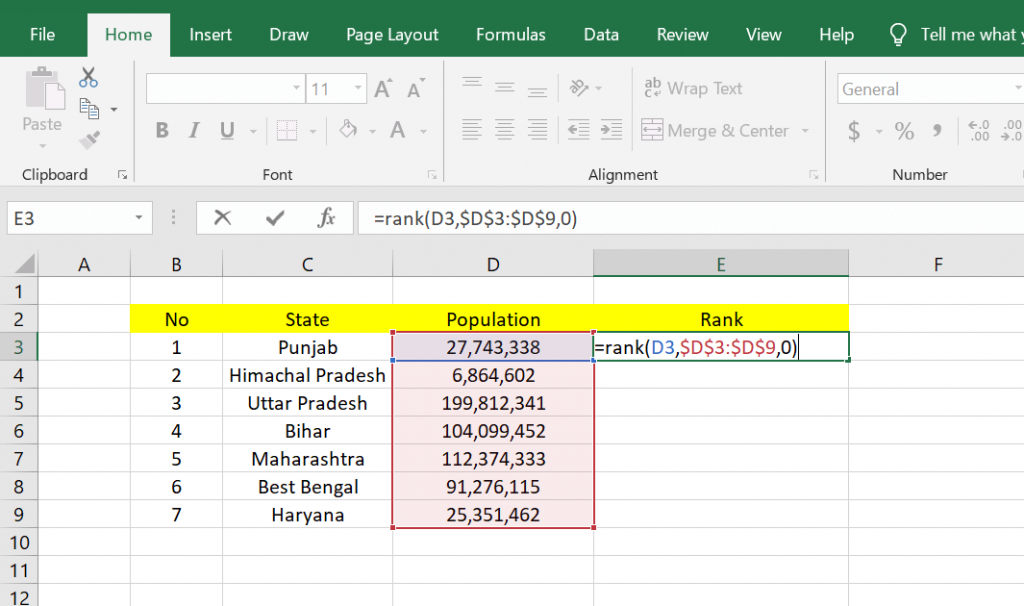
After that, you can write a formula to rank in Microsoft Excel in the fx column. And here’s the formula, =rank(number;ref;order) .
The meaning of the formula is = Rank Rank, which means it is a rank function. And (number; ref; order) means the initial cell number that has a value to be ranked, its reference, and the final cell number that has a value to be ranked, the reference.
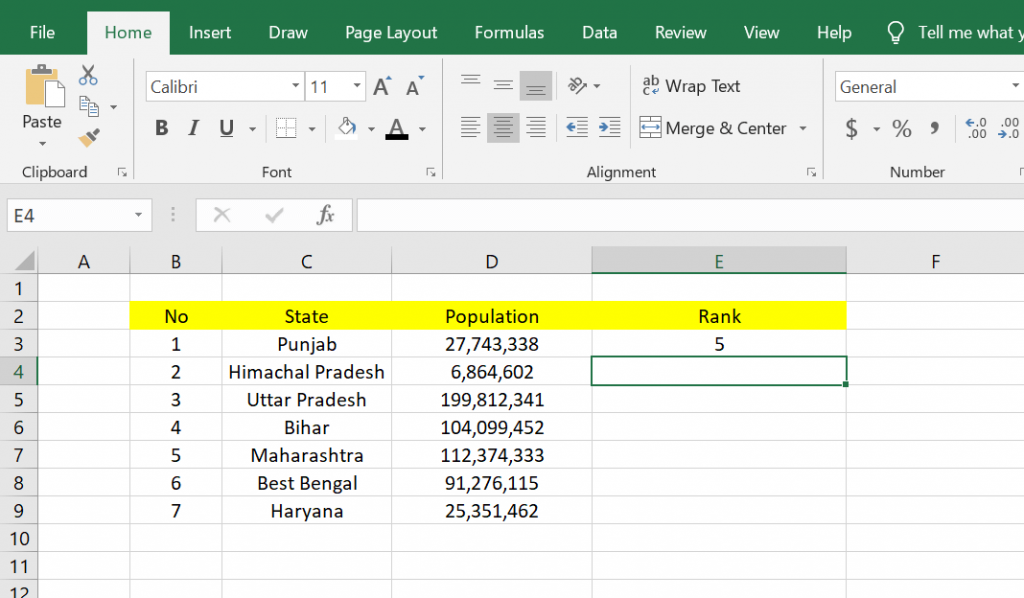
The formula is =Rank(D3;$D$3:$D$9;0) in the example below. After entering the function, you can press the Enter key on your keyboard. And here are the results, namely the ranking on data number 1, which has a ranking of 1.
3. If you want to do the same thing to all data as in data number 1, you have to copy the previous column, and then you can block the column below it and click Paste. Then you can see the results. All the columns in the Rank entity have been ranked in such away.
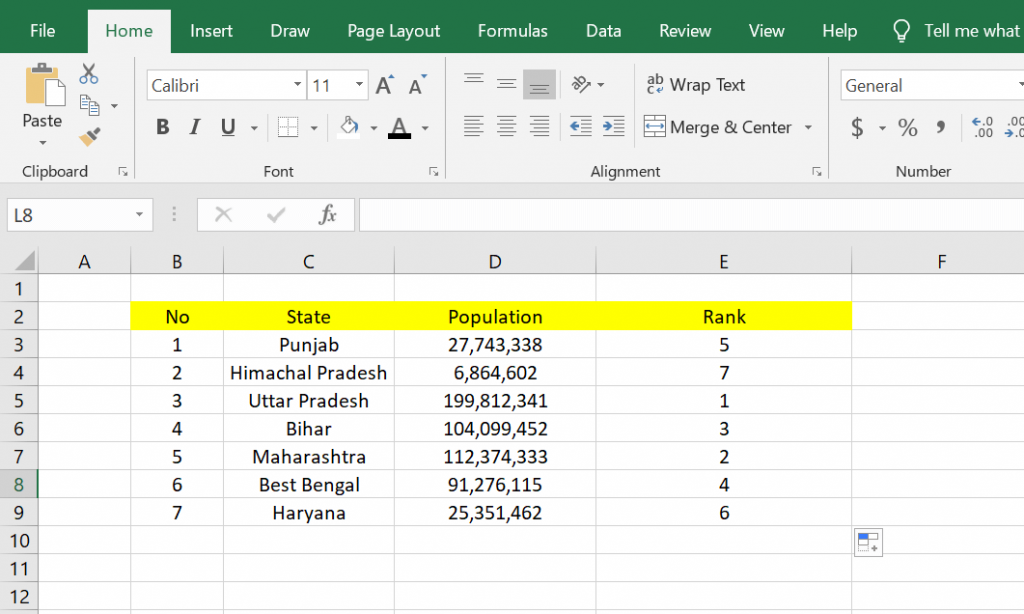
4. The results above are not satisfactory because the data is still not sorted, so it looks messy. We must make it sequentially according to the ranking from the smallest to the largest, and this example must be sorted from rank 1 to rank 9.
The way to sort it is to block the contents of all tables, but not with the column names and the contents of the column number.
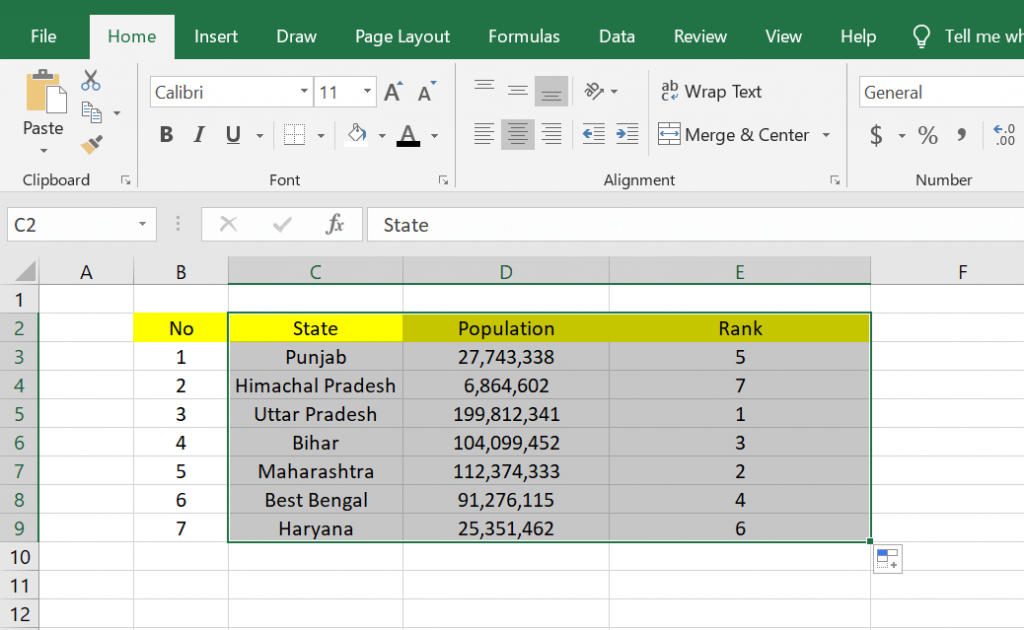
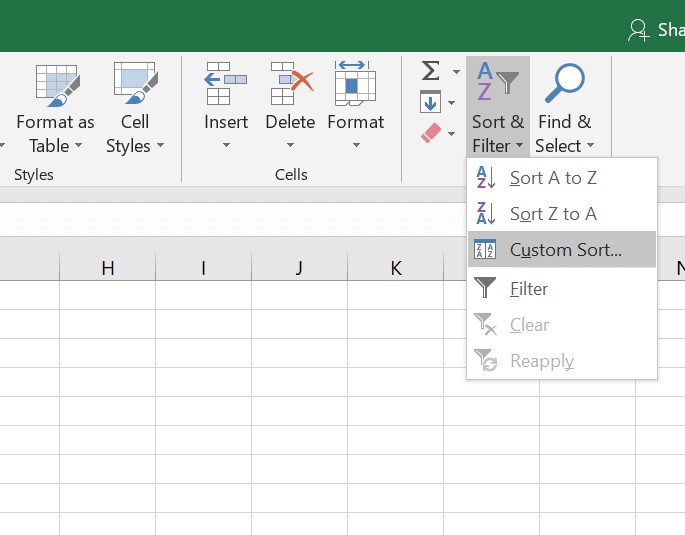
5. After that, you can do the sorting by going to the Editing tool, clicking Sort & Filter, and then clicking the Custom Sort option…
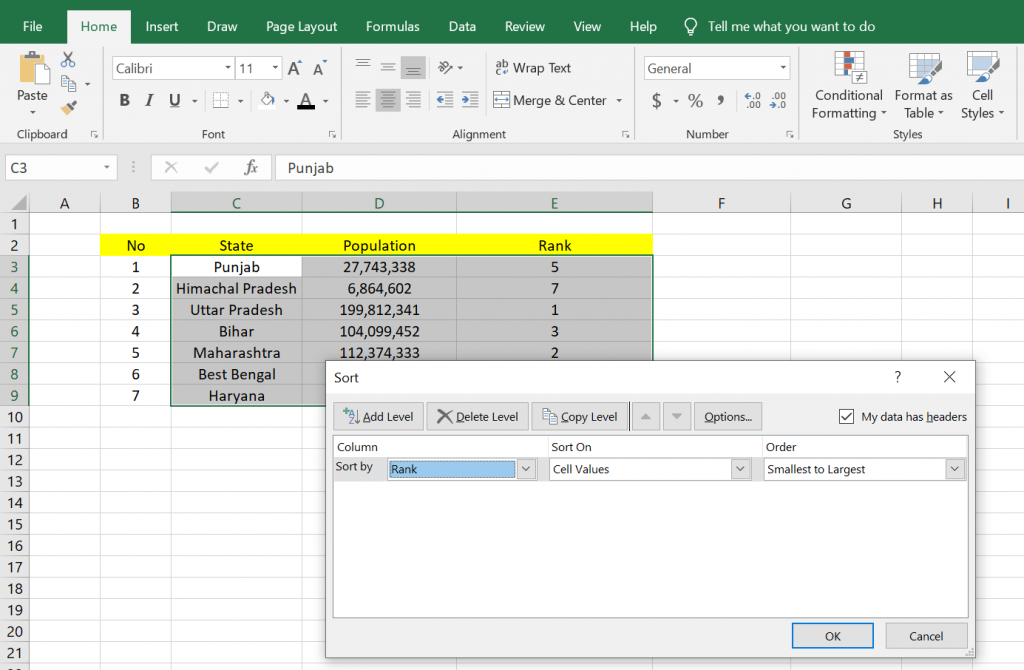
6. Then the Sort box will appear, where you have to choose sort by with the Rank option, some kind on with the Values option, and order with the Smallest to Largest option. After that, you can click OK.
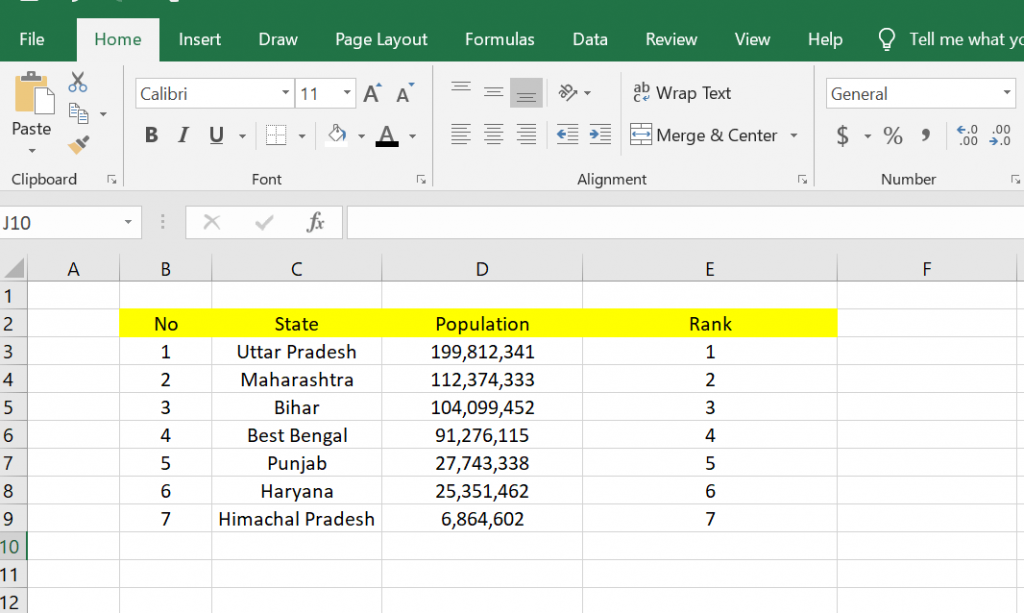
7. Below is the result of the sorting we have done above. In this way, the data that has been ranked will be sorted according to its ranking.
That’s the tutorial on how to rank using Microsoft Excel. Hopefully, this article can be useful for you.
MS Excel
How to Move Tables from Excel to Word Easily
Microsoft Office Excel is useful as a spreadsheet worksheet document famous for microcomputer activities on Windows platforms and other platforms such as Mac OS. With this excel, the data can be more structured and have handy capabilities.
As for the other product, Word is better known as a word processing application. Where has a WYSIWYG concept, namely ” What You See is What You Get.” This application program is also one of the best made by Microsoft that people on various user platforms widely use.
With the presence of these two application programs, it is expected to make work easier and make your work more optimally as desired.
Like wanting to move an Excel table to Word, how do you get the table you’re moving to match its source. This article will discuss how to transfer tables from Excel to Word quickly and how you want.
How to Move a Table from Excel to Word
One of the features provided to solve this problem is the copy-paste feature, which you must be familiar with. This copy function is to copy something and paste it by pasting it according to what has been copied. Paste also has several more functions, including the following:
Keep Source Formatting: Paste function in this option to maintain the appearance of the original Text according to the source that has been copied.
Use Destination Styles: This option is to format the text to match the style applied to the Text.
Link & Keep Source Formatting: In this option to maintain the link to the source file and display the original text according to the source that has been copied
Link & Use Destination Style: This function maintains a link to the source file and uses a text format that matches the style applied to the Text.
Keep Text Only: This option is only for pasting Text only. So all the formatting of the original text will be lost.
It’s a good idea to determine if you want to move the Excel table to Word with which function you need more. Let’s go straight to the steps to move an Excel table to Word.
1. Open your Excel file that contains the document you want to move to Word.
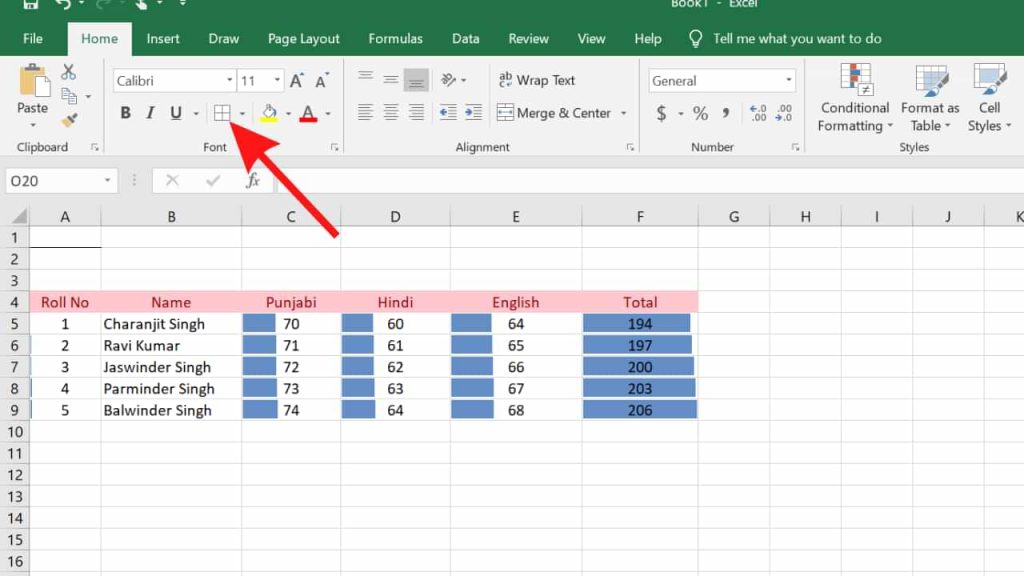
2. Before copying the table, make sure you give the table a border so that when it is transferred to Word, the results are neat. Block the table, then click Borders as indicated by the arrow.
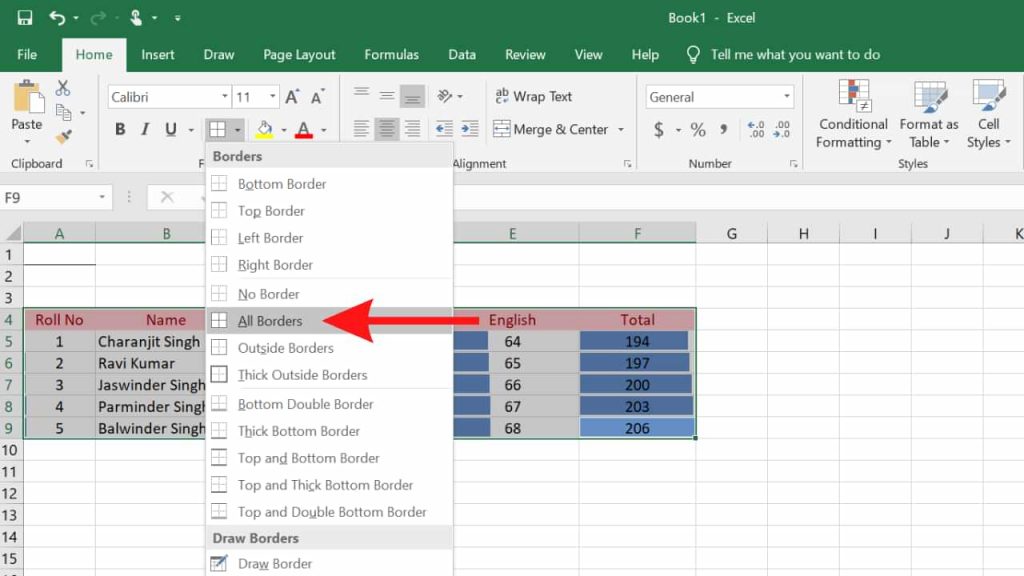
3. Then select All Borders.
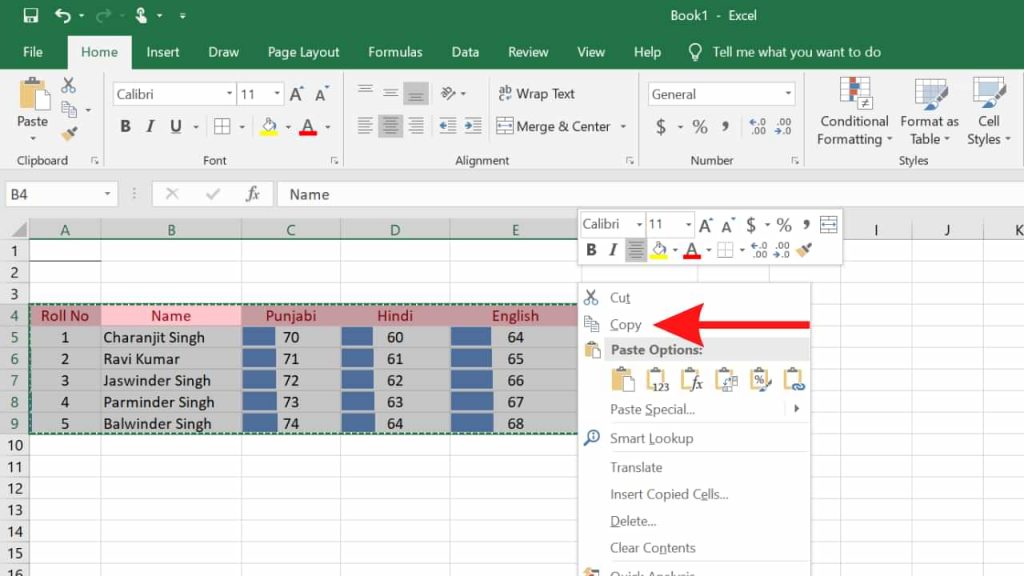
4. The table has been given a border for a neater result. Next, block the table, then right-click> Copy. Or you can use the Ctrl + C keys.
5. In the Word document, just right-click> Paste. Or you can press Ctrl + V.
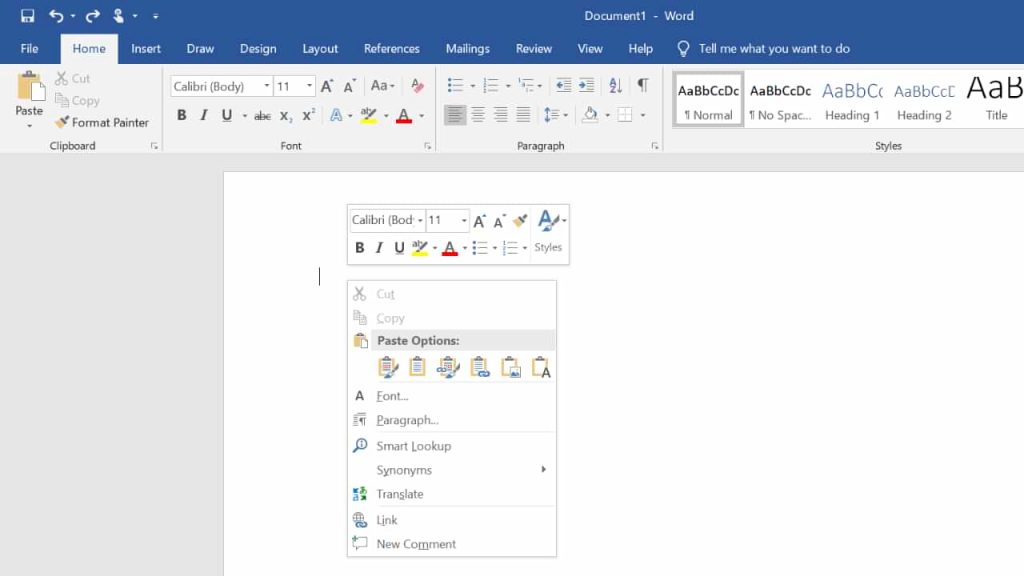
6. The result will be like this, exactly like the one in Excel.
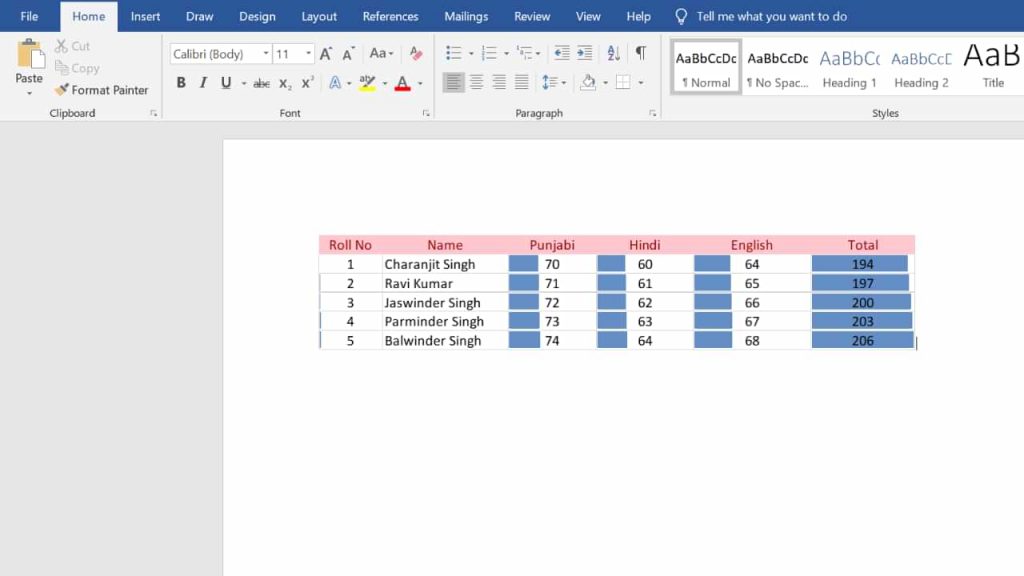
This is a tutorial on how to move tables from Excel to Word. Many features have never been used at all. So it’s a shame if we don’t try the features provided, moreover these features are handy for us. So many tutorials this time, hopefully, are useful for you.
MS Excel
How to Create a Table in Microsoft Excel

How to create a table in Microsoft Excel is very easy, you know, because basically, Excel consists of tables and a number processor.
The use of internal tables in this number processing software has become one of the things that are definitely needed, guys. Especially if you play with a lot of data in it.
However, until now there may still be many who do not know how to make it. Therefore, we will provide a complete tutorial for you.
But before going into the steps, you need to know a few things about the following table.
Table of Contents :
HOW TO CREATE A TABLE IN MICROSOFT EXCEL
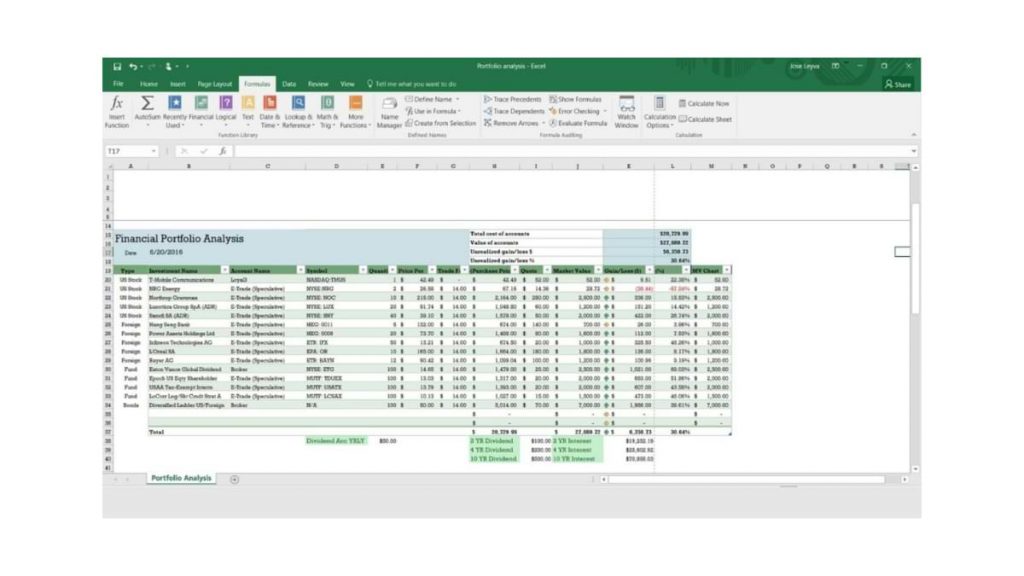
Before creating a table, make sure you already have the data and already know what kind of table you want to create.
Btw, do you know what a table is? And how is it different from tables in other software?
What is a Table in Excel?
Tables are a feature that can help you group data together, so the data you have is easier to read.
Like tables in general, this number processing software also consists of columns and rows that you can adjust the amount according to your needs.
Table Functions in Microsoft Excel
The main function of a table in Excel is to add rows of data without changing the writing structure that has been created.
No less important, the tables in this number processing software can serve to make your data look more attractive and easy to understand.
You can edit the table as needed, so the existence of the table feature is very important for making a data report.
How to Create a Table in Microsoft Excel
To make it is quite easy, you know. Do not believe? Take a look at the tutorial below.
If you think how to create a table in Microsoft Excel requires additional applications, then you are wrong guys. Because you can create tables directly, without third-party applications. So, this is the way.
- The first step, open Microsoft Excel on your PC.
- The block of data that you want to insert into the table.
- Then, click Insert – Table.
- Then, make sure the data you want to enter into the table is correct.
- Finally, click OK.
Finished! If you think the table made is less attractive, you can edit it on the Table Style menu. In addition, you can also change the color of the column to make it easier for others to read.
How? How to make a table in Microsoft Excel is really easy, right?
So, good luck with that!
-

 Phones5 years ago
Apple iPhone 11 (2019) – Release, Info, Leaks, Rumors
-
![Huawei's New Operating System is HarmonyOS [ Officially ],harmony os,huawei new operating system, huawei harmony OS,](https://www.thedigitnews.com/wp-content/uploads/2019/08/Screenshot__2285_-removebg-preview-2-1-400x240.png)
![Huawei's New Operating System is HarmonyOS [ Officially ],harmony os,huawei new operating system, huawei harmony OS,](https://www.thedigitnews.com/wp-content/uploads/2019/08/Screenshot__2285_-removebg-preview-2-1-80x80.png) Phones5 years ago
Phones5 years agoHuawei New Operating System is HarmonyOS [ Officially ]
-

 News5 years ago
Belle Delphine bath water – Instagram Model Sells Used Bathwater For 30$ To Their Loyal Followers
-

 Tech5 years ago
Levi’s Bluetooth Jacket Lets You Control Your Smartphone


